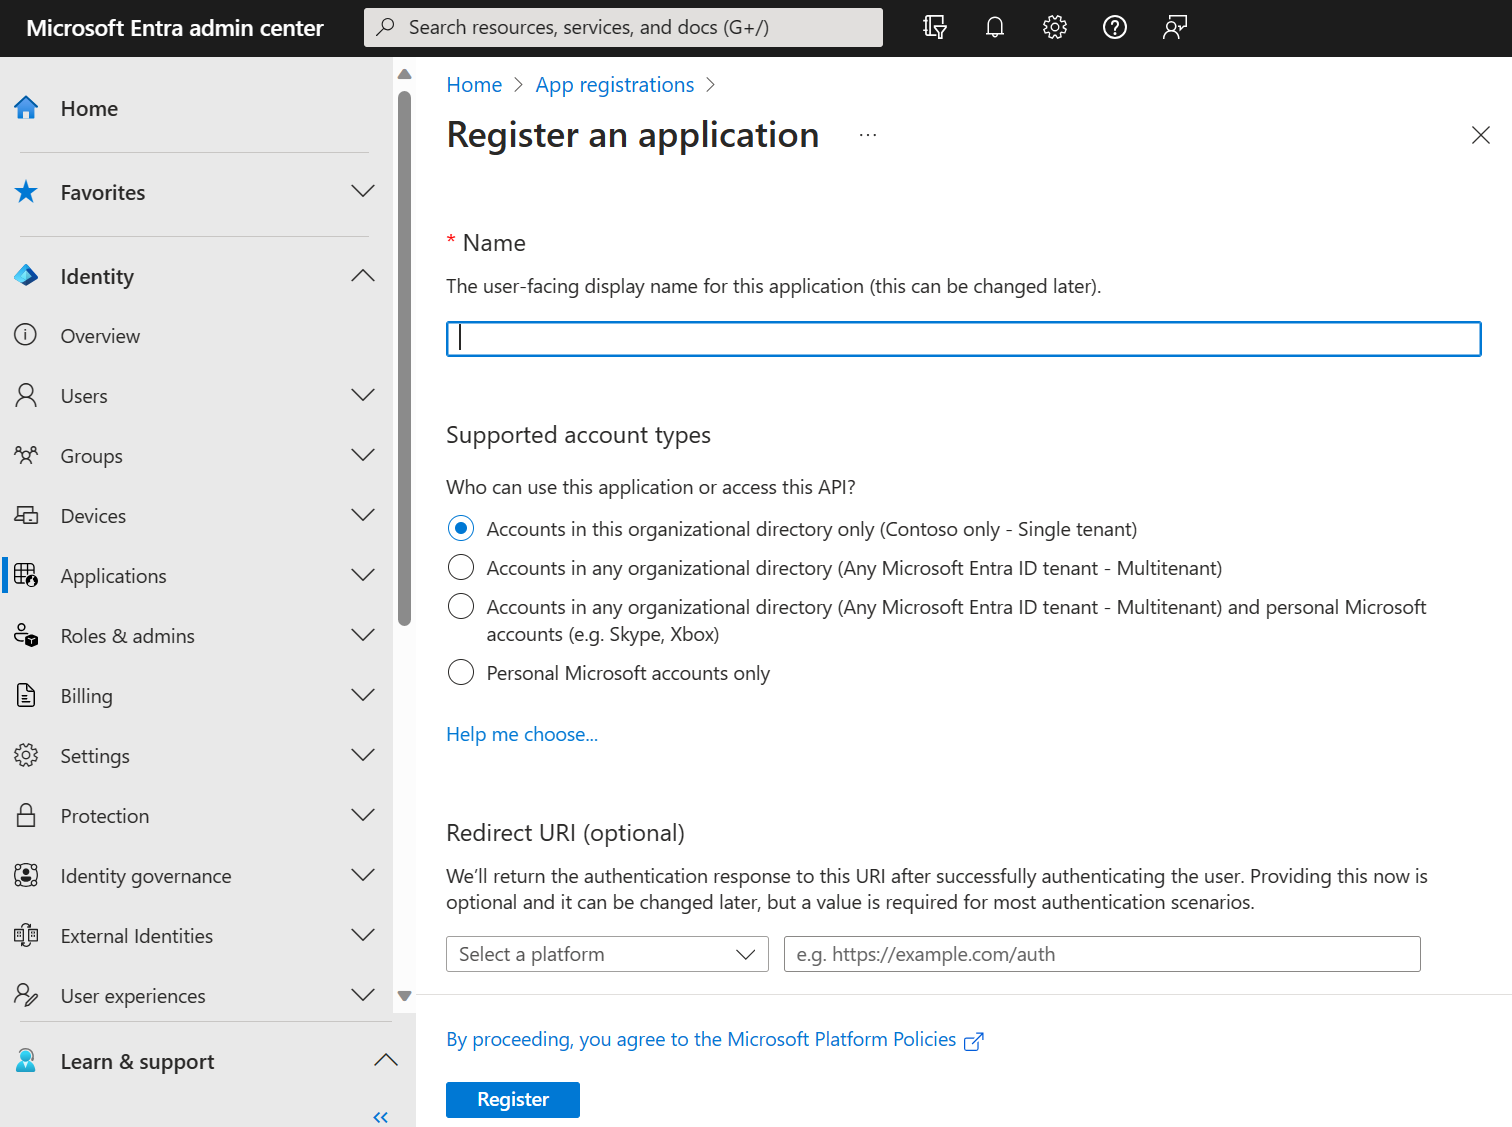
# Azure

## Prerequisites <a href="#prerequisites" id="prerequisites"></a>

* An Azure account that has an active subscription. [Create an account for free](https://azure.microsoft.com/free/?WT.mc_id=A261C142F).
* The Azure account must be at least a [Cloud application administrator](https://learn.microsoft.com/en-us/entra/identity/role-based-access-control/permissions-reference#cloud-application-administrator). Advanced users may also want to manually assign the [permissions](#manual-configuration-of-permissions).
* Completion of the [Set up a tenant](https://learn.microsoft.com/en-us/entra/identity-platform/quickstart-create-new-tenant) quickstart.

A tenant is a [Microsoft Entra ID](https://learn.microsoft.com/en-us/azure/active-directory/fundamentals/active-directory-whatis) entity that typically encompasses an organization. Tenants can have one or more subscriptions, which are agreements with Microsoft to use cloud services, including Azure. Every Azure resource is associated with a subscription.

Each subscription has an ID associated with it, as does the tenant to which a subscription belongs. As you perform different tasks, you may need the ID for a subscription or tenant. You can find these values in the Azure portal.

## Step-by-Step guide <a href="#find-your-azure-subscription" id="find-your-azure-subscription"></a>

### Find your Azure subscription <a href="#find-your-azure-subscription" id="find-your-azure-subscription"></a>

Follow these steps to retrieve the ID for a subscription in the Azure portal.

1. Sign in to the [Azure portal](https://portal.azure.com/).
2. Under the Azure services heading, select **Subscriptions**. If you don't see **Subscriptions** here, use the search box to find it.
3. Find the subscription in the list, and note the **Subscription ID** shown in the second column. If no subscriptions appear, or you don't see the right one, you may need to [switch directories](https://learn.microsoft.com/en-us/azure/azure-portal/set-preferences#switch-and-manage-directories) to show the subscriptions from a different Microsoft Entra tenant.
4. To easily copy the **Subscription ID**, select the subscription name to display more details. Select the **Copy to clipboard** icon shown next to the **Subscription ID** in the **Essentials** section. You can paste this value into a text document or other location.

   <figure><img src="https://learn.microsoft.com/en-us/azure/azure-portal/media/get-subscription-tenant-id/copy-subscription-id.png" alt=""><figcaption></figcaption></figure>

{% hint style="info" %}
Tip

You can also list your subscriptions and view their IDs programmatically by using [Get-AzSubscription](https://learn.microsoft.com/en-us/powershell/module/az.accounts/get-azsubscription) (Azure PowerShell) or [az account list](https://learn.microsoft.com/en-us/cli/azure/account#az-account-list) (Azure CLI).
{% endhint %}

### Register Resource Providers <a href="#find-your-microsoft-entra-tenant" id="find-your-microsoft-entra-tenant"></a>

Follow these steps to register resource providers:

1. Under the Azure services heading, select **Subscriptions**. If you don't see **Subscriptions** here, use the search box to find it.
2. Select in the left Settings menu **Resource Providers**. You may want to search for the term simply.
3. Register the following resources with the subscription:  "Microsoft.Capacity", "Microsoft.Compute", "Microsoft.Network", "Microsoft.Storage"

### Find your Microsoft Entra tenant <a href="#find-your-microsoft-entra-tenant" id="find-your-microsoft-entra-tenant"></a>

Follow these steps to retrieve the ID for a Microsoft Entra tenant in the Azure portal.

1. Sign in to the [Azure portal](https://portal.azure.com/).
2. Confirm that you are signed into the tenant for which you want to retrieve the ID. If not, [switch directories](https://learn.microsoft.com/en-us/azure/azure-portal/set-preferences#switch-and-manage-directories) so that you're working in the right tenant.
3. Under the Azure services heading, select **Microsoft Entra ID**. If you don't see **Microsoft Entra ID** here, use the search box to find it.
4. Find the **Tenant ID** in the **Basic information** section of the **Overview** screen.
5. Copy the **Tenant ID** by selecting the **Copy to clipboard** icon shown next to it. You can paste this value into a text document or other location.

   <figure><img src="https://learn.microsoft.com/en-us/azure/azure-portal/media/get-subscription-tenant-id/copy-tenant-id.png" alt=""><figcaption></figcaption></figure>

{% hint style="info" %}
Tip

You can also find your tenant programmatically by using [Azure Powershell](https://learn.microsoft.com/en-us/azure/active-directory/fundamentals/how-to-find-tenant#find-tenant-id-with-powershell) or [Azure CLI](https://learn.microsoft.com/en-us/azure/active-directory/fundamentals/how-to-find-tenant#find-tenant-id-with-cli).
{% endhint %}

The Microsoft identity platform performs identity and access management (IAM) only for registered applications. Whether it's a client application like a web or mobile app, or it's a web API that backs a client app, registering it establishes a trust relationship between your application and the identity provider, the Microsoft identity platform.

### Register an application <a href="#register-an-application" id="register-an-application"></a>

Registering your application establishes a trust relationship between your app and the Microsoft identity platform. The trust is unidirectional: your app trusts the Microsoft identity platform, and not the other way around. Once created, the application object cannot be moved between different tenants.

Follow these steps to create the app registration:

1. Sign in to the [Microsoft Entra admin center](https://entra.microsoft.com/) as at least a [Cloud Application Administrator](https://learn.microsoft.com/en-us/entra/identity/role-based-access-control/permissions-reference#cloud-application-administrator).
2. If you have access to multiple tenants, use the **Settings** icon ![](https://learn.microsoft.com/en-us/entra/identity-platform/media/common/admin-center-settings-icon.png) in the top menu to switch to the tenant in which you want to register the application from the **Directories + subscriptions** menu.
3. Browse to **Identity** > **Applications** > **App registrations** and select **New registration**.
4. Enter a display **Name** for your application. Users of your application might see the display name when they use the app, for example during sign-in. You can change the display name at any time and multiple app registrations can share the same name. The app registration's automatically generated Application (client) ID, not its display name, uniquely identifies your app within the identity platform.
5. Specify who can use the application, sometimes called its *sign-in audience*.

   Expand table

   <table><thead><tr><th width="295.5">Supported account types</th><th>Description</th></tr></thead><tbody><tr><td><strong>Accounts in this organizational directory only</strong></td><td>Select this option if you're building an application for use only by users (or guests) in <em>your</em> tenant.<br><br>Often called a <em>line-of-business</em> (LOB) application, this app is a <em>single-tenant</em> application in the Microsoft identity platform.</td></tr><tr><td><strong>Accounts in any organizational directory</strong></td><td>Select this option if you want users in <em>any</em> Microsoft Entra tenant to be able to use your application. This option is appropriate if, for example, you're building a software-as-a-service (SaaS) application that you intend to provide to multiple organizations.<br><br>This type of app is known as a <em>multitenant</em> application in the Microsoft identity platform.</td></tr><tr><td><strong>Accounts in any organizational directory and personal Microsoft accounts</strong></td><td>Select this option to target the widest set of customers.<br><br>By selecting this option, you're registering a <em>multitenant</em> application that can also support users who have personal <em>Microsoft accounts</em>. Personal Microsoft accounts include Skype, Xbox, Live, and Hotmail accounts.</td></tr><tr><td><strong>Personal Microsoft accounts</strong></td><td>Select this option if you're building an application only for users who have personal Microsoft accounts. Personal Microsoft accounts include Skype, Xbox, Live, and Hotmail accounts.</td></tr></tbody></table>
6. Don't enter anything for **Redirect URI (optional)**. You'll configure a redirect URI in the next section.
7. Select **Register** to complete the initial app registration.

   <figure><img src="https://learn.microsoft.com/en-us/entra/identity-platform/media/quickstart-register-app/portal-02-app-reg-01.png" alt=""><figcaption></figcaption></figure>

When registration finishes, the Microsoft Entra admin center displays the app registration's **Overview** pane. You see the **Application (client) ID**. Also called the *client ID*, this value uniquely identifies your application in the Microsoft identity platform.

{% hint style="info" %}
Important

New app registrations are hidden to users by default. When you are ready for users to see the app on their [My Apps page](https://support.microsoft.com/account-billing/sign-in-and-start-apps-from-the-my-apps-portal-2f3b1bae-0e5a-4a86-a33e-876fbd2a4510) you can enable it. To enable the app, in the Microsoft Entra admin center navigate to **Identity** > **Applications** > **Enterprise applications** and select the app. Then on the **Properties** page toggle **Visible to users?** to Yes.
{% endhint %}

Your application's code, or more typically an authentication library used in your application, also uses the client ID. The ID is used as part of validating the security tokens it receives from the identity platform.

<figure><img src="https://learn.microsoft.com/en-us/entra/identity-platform/media/quickstart-register-app/portal-03-app-reg-02.png" alt=""><figcaption></figcaption></figure>

### Assign a role to the application

To access resources in your subscription, you must assign a role to the application. Decide which role offers the right permissions for the application. To learn about the available roles, see [Azure built-in roles](https://learn.microsoft.com/en-us/azure/role-based-access-control/built-in-roles).

You can set the scope at the level of the subscription, resource group, or resource. Permissions are inherited to lower levels of scope.

1. Sign in to the [Azure portal](https://portal.azure.com/).
2. Select the level of scope you wish to assign the application to. For example, to assign a role at the subscription scope, search for and select **Subscriptions**. If you don't see the subscription you're looking for, select **global subscriptions filter**. Make sure the subscription you want is selected for the tenant.
3. Select **Access control (IAM)**.
4. Select **Add**, then select **Add role assignment**.
5. In the **Role** tab, select the role you wish to assign to the application in the list.
6. Select **Next**.
7. On the **Members** tab, for **Assign access to**, select **User, group, or service principal**.
8. Select **Select members**. By default, Microsoft Entra applications aren't displayed in the available options. To find your application, search for it by name.
9. Select the **Select** button, then select **Review + assign**.

<figure><img src="https://1689087729-files.gitbook.io/~/files/v0/b/gitbook-x-prod.appspot.com/o/spaces%2FmzjpiPnGVwTaHdGYte2r%2Fuploads%2FM1jyvLG9PZp153eTqkFo%2FScreenshot%202024-06-03%20at%2013.28.37.png?alt=media&#x26;token=229d25fc-d71e-4f7e-a27a-141fe8c6fa70" alt=""><figcaption></figcaption></figure>

### Add credentials <a href="#add-credentials" id="add-credentials"></a>

Credentials are used by [confidential client applications](https://learn.microsoft.com/en-us/entra/identity-platform/msal-client-applications) that access a web API. Examples of confidential clients are web apps, other web APIs, or service-type and daemon-type applications. Credentials allow your application to authenticate as itself, requiring no interaction from a user at runtime.

<figure><img src="https://learn.microsoft.com/en-us/entra/identity-platform/media/quickstart-register-app/portal-05-app-reg-04-credentials.png" alt=""><figcaption></figcaption></figure>

#### Add a client secret <a href="#add-a-client-secret" id="add-a-client-secret"></a>

Sometimes called an *application password*, a client secret is a string value your app can use in place of a certificate to identity itself.

Client secrets are considered less secure than certificate credentials. Application developers sometimes use client secrets during local app development because of their ease of use. However, you should use certificate credentials for any of your applications that are running in production.

1. In the Microsoft Entra admin center, in **App registrations**, select your application.
2. Select **Certificates & secrets** > **Client secrets** > **New client secret**.
3. Add a description for your client secret.
4. Select an expiration for the secret or specify a custom lifetime.
   * Client secret lifetime is limited to two years (24 months) or less. You can't specify a custom lifetime longer than 24 months.
   * Microsoft recommends that you set an expiration value of less than 12 months.
5. Select **Add**.
6. *Record the secret's value* for use in your client application code. This secret value is *never displayed again* after you leave this page.

<figure><img src="https://1689087729-files.gitbook.io/~/files/v0/b/gitbook-x-prod.appspot.com/o/spaces%2FmzjpiPnGVwTaHdGYte2r%2Fuploads%2Fl6ZVZbUBcMlEEgnpuRCU%2Fimage.png?alt=media&#x26;token=e3a9b7d1-0ba9-4a01-8615-5d79569aba9d" alt=""><figcaption></figcaption></figure>

in the EMCP, go to **vHSM** -> Vault -> Cloud Keys to add the API key. Once you finish everything, fill in the details of all the IDs and secrets you saw above.

## Manual Configuration of Permissions

Register resource providers ("Microsoft.Capacity", "Microsoft.Compute", "Microsoft.Network", "Microsoft.Storage") and add permissions:

```
"Microsoft.Compute/virtualMachines/write",
"Microsoft.Resources/subscriptions/resourceGroups/read",
"Microsoft.Resources/subscriptions/resourceGroups/write",
"Microsoft.Resources/subscriptions/resourceGroups/delete",
"Microsoft.Network/networkInterfaces/write",
"Microsoft.Network/networkSecurityGroups/write",
"Microsoft.Network/networkSecurityGroups/securityRules/write",
"Microsoft.Network/publicIPAddresses/write",
"Microsoft.Compute/virtualMachines/read",
"Microsoft.Network/virtualNetworks/write",
"Microsoft.Compute/virtualMachines/start/action",
"Microsoft.Compute/virtualMachines/powerOff/action",
"Microsoft.Network/virtualNetworks/subnets/write",
"Microsoft.Compute/virtualMachines/delete",
"Microsoft.Network/virtualNetworks/delete",
"Microsoft.Network/virtualNetworks/subnets/delete",
"Microsoft.Network/publicIPAddresses/delete",
"Microsoft.Network/networkSecurityGroups/delete",
"Microsoft.Network/networkSecurityGroups/securityRules/delete",
"Microsoft.Network/virtualNetworks/subnets/join/action",
"Microsoft.Network/publicIPAddresses/join/action",
"Microsoft.Network/networkInterfaces/join/action",
"Microsoft.Compute/disks/delete",
"Microsoft.Network/networkInterfaces/delete"
```

Please verify that the app/account has also sufficient quotas in the datacenter regions of choice.
