> For the complete documentation index, see [llms.txt](https://docs.enclaive.cloud/vault/llms.txt). Markdown versions of documentation pages are available by appending `.md` to page URLs; this page is available as [Markdown](https://docs.enclaive.cloud/vault/tutorials/use-cases/dynamic-credentials-for-cloud-providers/azure.md).
# Azure
Dynamic secrets are a core feature in Vault. A class of dynamic secrets is on-demand, revocable, time-limited access credentials for cloud providers.
### Challenge
To consume Azure services (e.g. Azure Kubernetes service), the client must have valid Azure credentials. Azure uses [**service principal**](https://docs.microsoft.com/en-us/azure/active-directory/develop/app-objects-and-service-principals) to authenticate its users. An Azure service principal is an identity created for use with applications, hosted services, and automated tools to access Azure resources. So each new application adds operational overhead as more service principals are required.
### Solution
Automate the process by integrating your applications with Vault's Azure secrets engine. The applications ask Vault for Azure credential with a time-to-live (TTL) enforcing its validity so that the credentials are automatically revoked when they are no longer used.
#### Benefits
Each app instance can request unique, short-lived credentials. Unique credentials ensures isolated, auditable access and enable revocation of a single client. While short-lived reduces the time frame in which they are valid.
{% hint style="info" %}
This tutorial demonstrates the use of **azure** secrets engine to dynamically generate azure credentials.
{% endhint %}
### Personas
The end-to-end scenario described in this tutorial involves two personas:
* `admin` with privileged permissions to configure secrets engines
* `apps` read the secrets from Vault
### Prerequisites
This tutorial assumes the following:
* You have a Microsoft Azure account
* Vault installed
#### Policy requirements
Each persona requires a different set of capabilities. These are expressed in policies.
### Lab setup
1. Open **a new terminal window** and start a Vault dev server with `root` as the root token.
```shell-session
$ vault server -dev -dev-root-token-id root
```
The Vault dev server defaults to running at `127.0.0.1:8200`. The server is initialized and unsealed.
{% hint style="danger" %}
**Insecure operation**: Do not run a Vault dev server in production. This approach starts a Vault server with an in-memory database and runs in an insecure way.
{% endhint %}
2. Export an environment variable for the `vault` CLI to address the Vault server.
```shell-session
$ export VAULT_ADDR=http://127.0.0.1:8200
```
3. Export an environment variable for the `vault` CLI to authenticate with the Vault server.
```shell-session
$ export VAULT_TOKEN=root
```
{% hint style="warning" %}
For these tasks, you can use Vault's *root* token. However, it is recommended that root tokens are only used for enough initial setup or in emergencies. As a best practice, use an authentication method or token that meets the policy requirements.
{% endhint %}
The Vault server is ready.
### Create an Azure service principal and resource group
(**Persona:** admin)
To delegate the credential generation task to Vault, you need to give Vault privileged Azure credentials to perform the task. The following demonstrates the creation of a service principal.
{% hint style="danger" %}
**Production**
The service principal should be dedicated to the Vault secrets engine.
Invoking the `rotate-root` command will delete the existing client secret and generate a new secret known only to Vault.
{% endhint %}
{% hint style="warning" %}
**Note**
Refer to the [online Azure documentation](https://docs.microsoft.com/en-us/azure/active-directory/develop/howto-create-service-principal-portal) for more details.
{% endhint %}
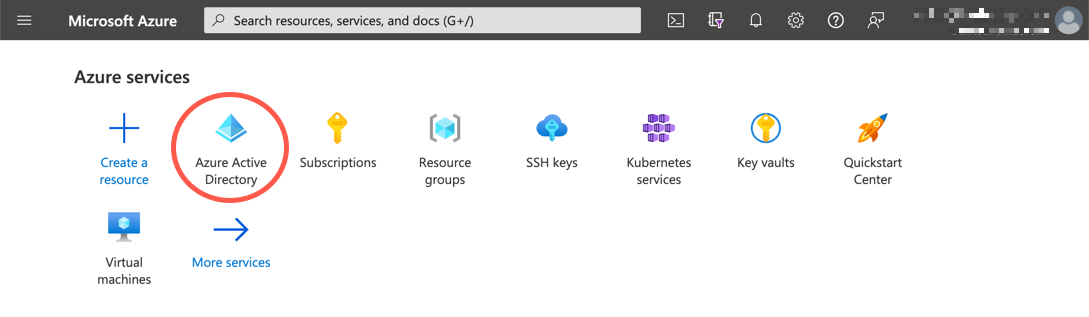
1. Launch the [Microsoft Azure Portal](https://portal.azure.com/) and sign in.
2. Select **Azure Active Directory** and select **Properties**.
 3. Copy the **Tenant ID**.
 4. In a terminal, set the variable `TENANT_ID` to the **Tenant ID**.
```shell-session
$ export TENANT_ID=
```
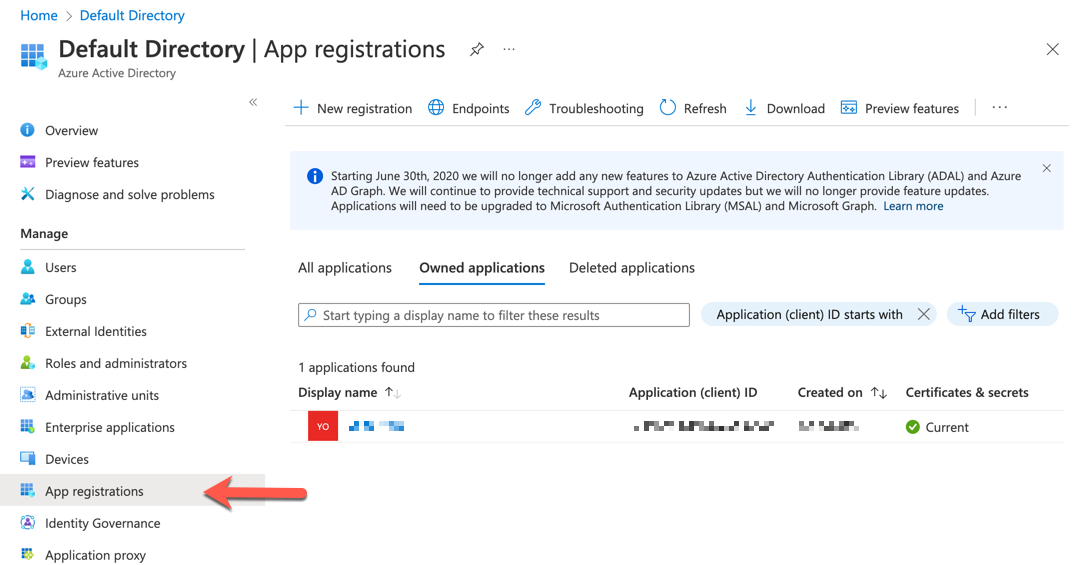
5. From the side navigation, select **App registrations**.
4. In a terminal, set the variable `TENANT_ID` to the **Tenant ID**.
```shell-session
$ export TENANT_ID=
```
5. From the side navigation, select **App registrations**.
 6. Select **New registrations**.
 7. Enter a desired name in the **Name** field (e.g. `vault-education`).
8. Click **Register**.
9. Copy the **Application (client) ID**.
7. Enter a desired name in the **Name** field (e.g. `vault-education`).
8. Click **Register**.
9. Copy the **Application (client) ID**.
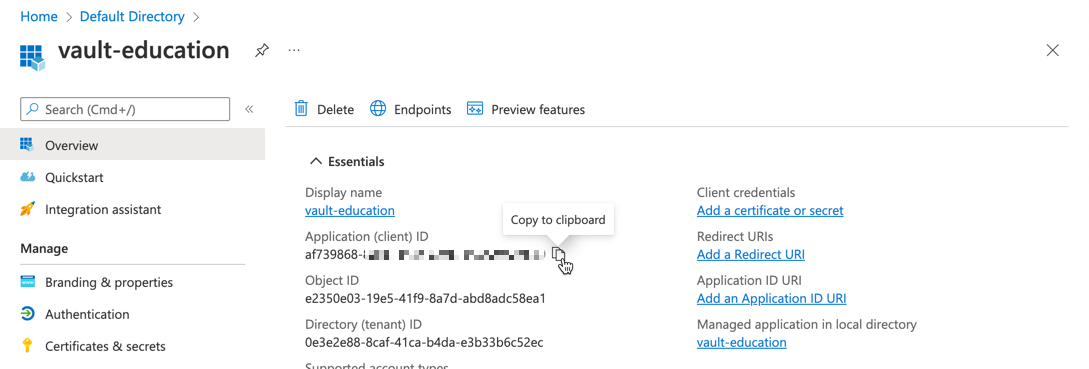 10. In a terminal, set the variable `CLIENT_ID` to the **Application (client) ID**.
```shell-session
$ export CLIENT_ID=
```
11. From the side navigation, select **Certificate & secrets**.
12. Under the **Client secrets**, click **New client secret**.
13. Enter a description in the **Description** field.
10. In a terminal, set the variable `CLIENT_ID` to the **Application (client) ID**.
```shell-session
$ export CLIENT_ID=
```
11. From the side navigation, select **Certificate & secrets**.
12. Under the **Client secrets**, click **New client secret**.
13. Enter a description in the **Description** field.
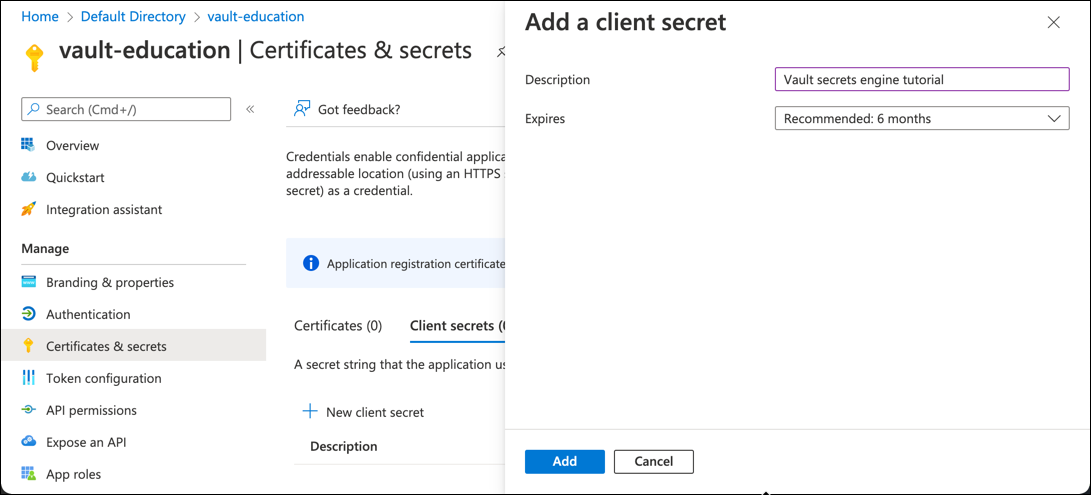 14. Click **Add**.
15. Copy the client secret value.
14. Click **Add**.
15. Copy the client secret value.
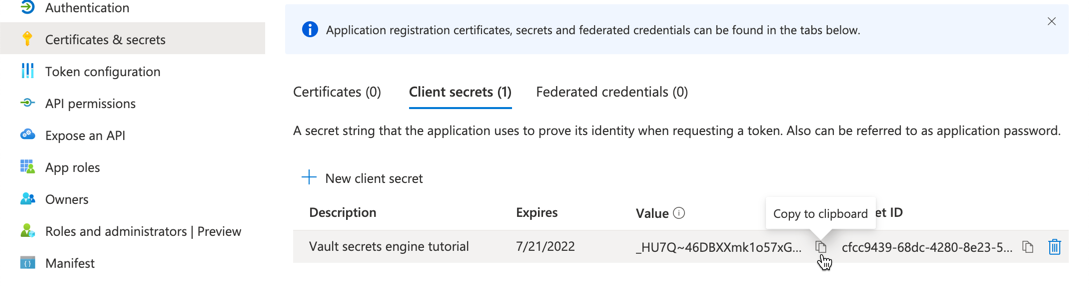 16. In a terminal, set the variable `CLIENT_SECRET` to the client secret value.
```shell-session
$ export CLIENT_SECRET=
```
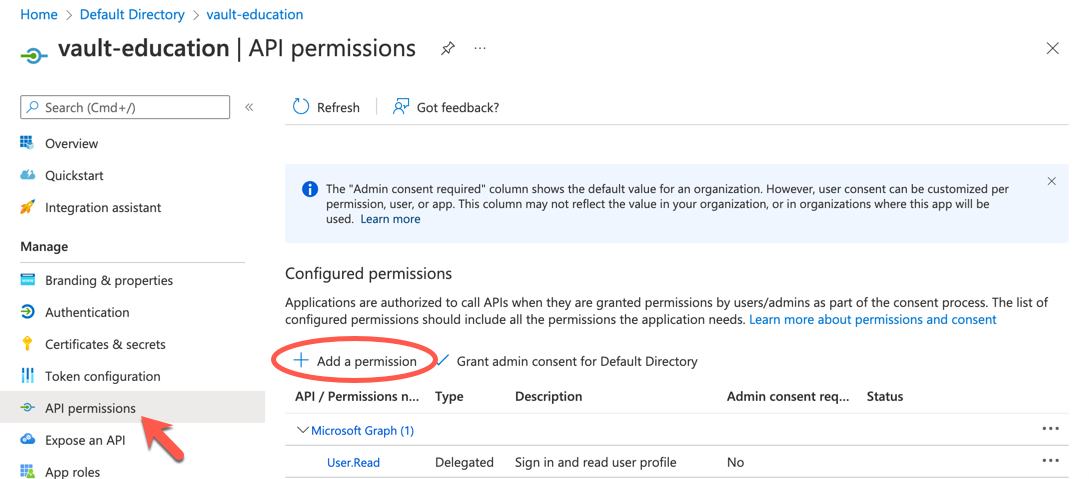
17. From the side navigation, click **API permissions**.
18. Under **Configured permissions**, click **Add a permission**.
16. In a terminal, set the variable `CLIENT_SECRET` to the client secret value.
```shell-session
$ export CLIENT_SECRET=
```
17. From the side navigation, click **API permissions**.
18. Under **Configured permissions**, click **Add a permission**.
 The Azure Secrets Engine documentation lists the Azure permissions need to be assigned.
19. Click **Microsoft Graph**.
The Azure Secrets Engine documentation lists the Azure permissions need to be assigned.
19. Click **Microsoft Graph**.
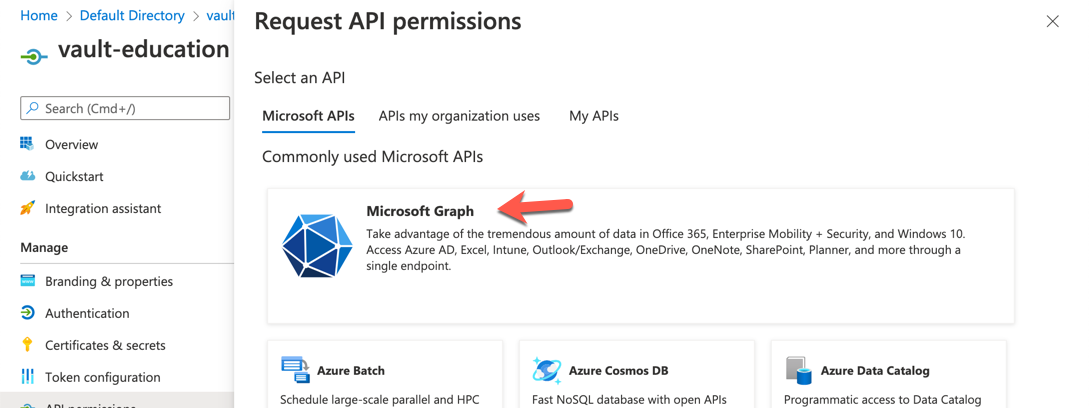 20. Select **Application permissions**.
21. Add the following permissions.
| Permission Name | Type |
| ----------------------------- | ----------- |
| Application.ReadWrite.OwnedBy | Application |
| GroupMember.ReadWrite.All | Application |
{% hint style="info" %}
Note
If you plan to use the rotate root credentials API, you'll need to change `Application.ReadWrite.OwnedBy` to `Application.ReadWrite.All`.
{% endhint %}
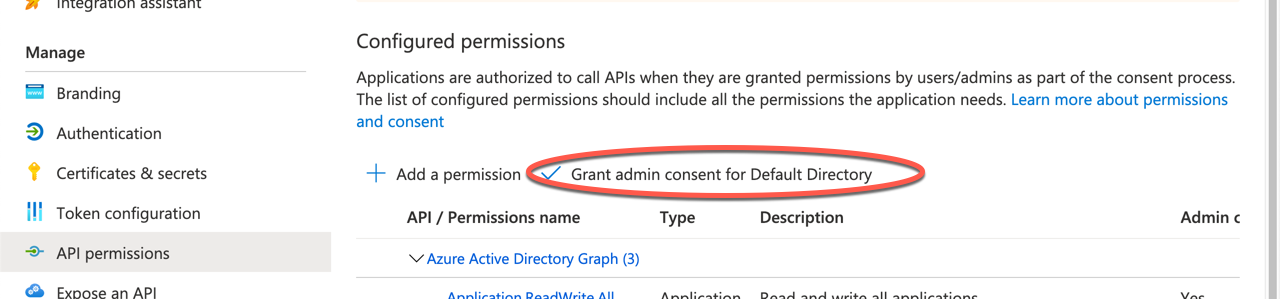
22. Click **Add permissions**.
23. Click **Grant admin consent for azure** to grant the permissions.
20. Select **Application permissions**.
21. Add the following permissions.
| Permission Name | Type |
| ----------------------------- | ----------- |
| Application.ReadWrite.OwnedBy | Application |
| GroupMember.ReadWrite.All | Application |
{% hint style="info" %}
Note
If you plan to use the rotate root credentials API, you'll need to change `Application.ReadWrite.OwnedBy` to `Application.ReadWrite.All`.
{% endhint %}
22. Click **Add permissions**.
23. Click **Grant admin consent for azure** to grant the permissions.
 24. Click **Yes** to confirm consent.
25. Navigate to the [Subscriptions](https://portal.azure.com/#blade/Microsoft_Azure_Billing/SubscriptionsBlade) blade.
26. Click the name of your subscription.
27. Copy the **Subscription ID**.
24. Click **Yes** to confirm consent.
25. Navigate to the [Subscriptions](https://portal.azure.com/#blade/Microsoft_Azure_Billing/SubscriptionsBlade) blade.
26. Click the name of your subscription.
27. Copy the **Subscription ID**.
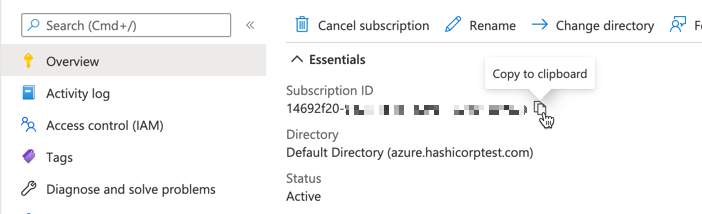 28. In a terminal, set the variable `SUBSCRIPTION_ID` to the **Subscription ID**.
```shell-session
$ export SUBSCRIPTION_ID=
```
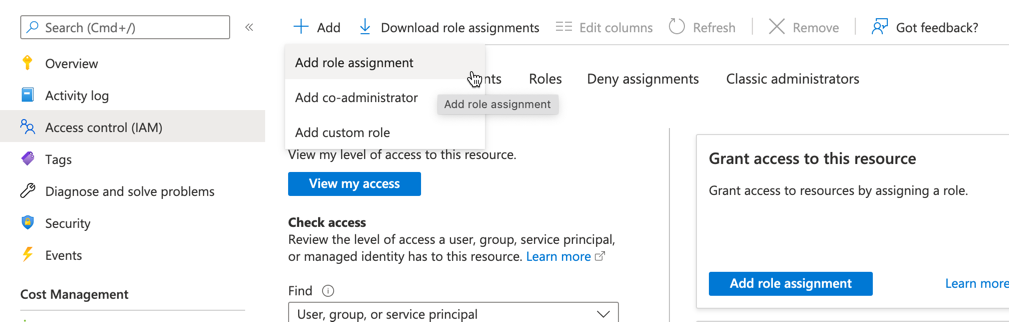
29. From the side navigation, click **Access control (IAM)**.
30. Click **Add > Add a role assignment**.
28. In a terminal, set the variable `SUBSCRIPTION_ID` to the **Subscription ID**.
```shell-session
$ export SUBSCRIPTION_ID=
```
29. From the side navigation, click **Access control (IAM)**.
30. Click **Add > Add a role assignment**.
 31. Select `User Access Administrator` and click **Next**.
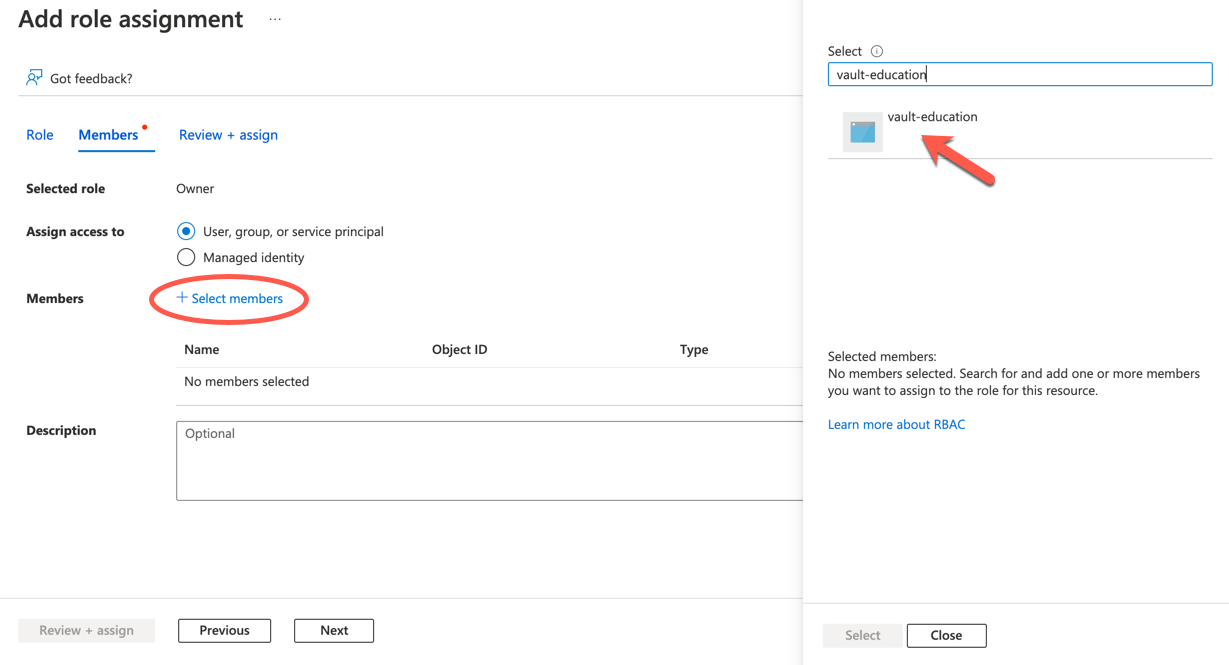
32. Click **Select members**.
33. Enter your application name or application id in the **Select** field.
34. Click the application when it is displayed which will add the application to the **Selected members** list.
31. Select `User Access Administrator` and click **Next**.
32. Click **Select members**.
33. Enter your application name or application id in the **Select** field.
34. Click the application when it is displayed which will add the application to the **Selected members** list.
 35. Click **Select**.
36. Click **Review + assign**, and then **Review + assign** gain.
The application is created with the correct permissions and you have these identifiers and credentials:
* Tenant ID
* Client ID
* Client Secret
* Subscription ID
#### Resource Group
The secrets engine generates credentials within an Azure resource group.
1. Navigate to the [Resource groups](https://portal.azure.com/#blade/HubsExtension/BrowseResourceGroups) blade.
2. Click **Create**.
35. Click **Select**.
36. Click **Review + assign**, and then **Review + assign** gain.
The application is created with the correct permissions and you have these identifiers and credentials:
* Tenant ID
* Client ID
* Client Secret
* Subscription ID
#### Resource Group
The secrets engine generates credentials within an Azure resource group.
1. Navigate to the [Resource groups](https://portal.azure.com/#blade/HubsExtension/BrowseResourceGroups) blade.
2. Click **Create**.
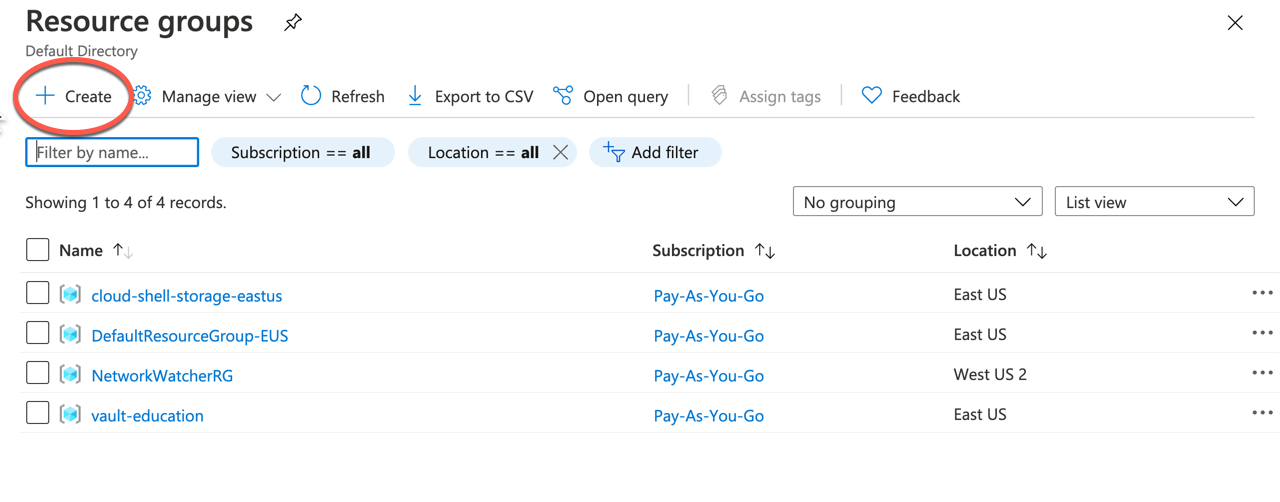 3. Choose the subscription from the **Subscription** select field.
4. Enter `vault-education` in the **Resource group** field.
3. Choose the subscription from the **Subscription** select field.
4. Enter `vault-education` in the **Resource group** field.
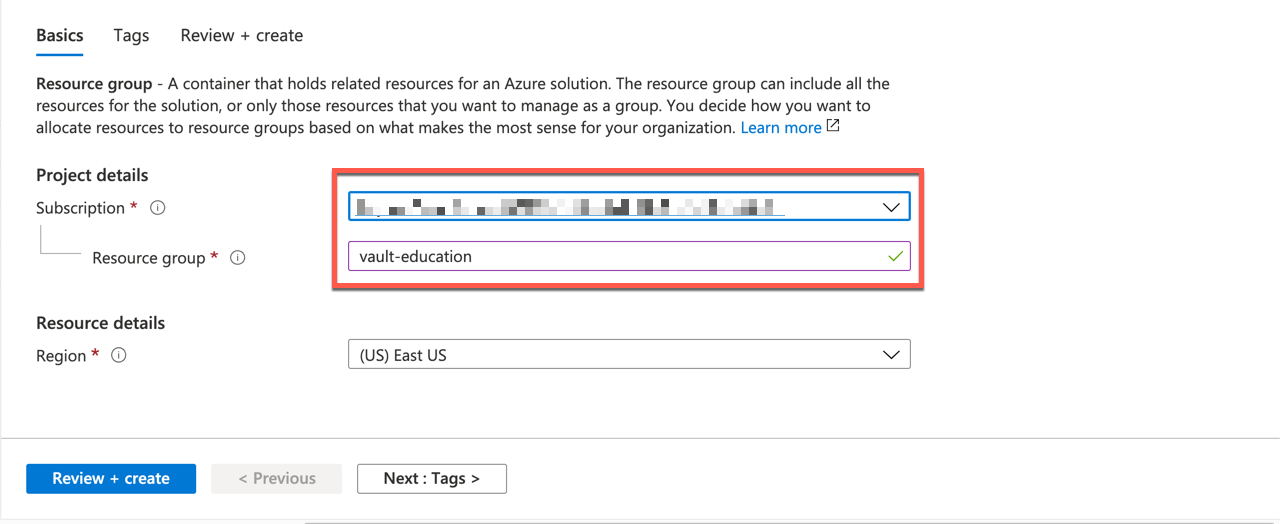 5. Click **Review + create**.
The view changes to display the review page.
6. Click **Create**.
The resource group `vault-education` is created.
### Configure Vault
With the necessary resources configured in Azure, you can configure the Azure secrets engine to dynamically generate Azure service principals.
#### Enable the Azure secrets engine
{% tabs %}
{% tab title="CLI command" %}
Enable the azure secrets engine at its default path.
```shell-session
$ vault secrets enable azure
```
The secrets engine is enabled at the path `azure/`. To enable the secrets engine at a different path requires that you use the `-path` parameter and the desired path.
{% endtab %}
{% tab title="API call using cURL" %}
Enable the azure secrets engine at the path named `azure`.
```shell-session
$ curl --header "X-Vault-Token: $VAULT_TOKEN" \
--request POST \
--data '{"type":"azure"}' \
$VAULT_ADDR/v1/sys/mounts/azure
```
The `data` field defines the type, `{"type":"azure"}`, of secrets engine to enable. The requested URL, `/v1/sys/mounts/azure`, defines the path of the secrets engine.
Note:
Additional [configuration parameters](https://developer.hashicorp.com/vault/api-docs/system/mounts#enable-secrets-engine) may be provided to configure the secrets engine. The path as well may be modified to support your needs.
{% endtab %}
{% tab title="Web UI" %}
1. Open a web browser and launch the Vault UI (e.g. `http://127.0.0.1:8200/ui`) and then login.
2. Select **Enable new engine**.
3. Select **Azure** from the list, and then click **Next**.
4. Click **Enable Engine** to complete. This sets the path to be `azure`.
**Note:**
In this tutorial, the azure secrets engine is enabled at the `/azure` path in Vault. However, it is possible to enable your secret engines at any location by entering your desired path in the **Path** text field.
{% endtab %}
{% endtabs %}
#### Configure the Azure secrets engine
(**Persona:** admin)
The Azure secrets engine requires the credentials you generated in the create an Azure service principal and resource group step to communicate with Azure and generate service principals.
Verify that your Azure subscription ID, client ID, client ID, and tenant ID are stored as environment variables.
```shell-session
$ echo $SUBSCRIPTION_ID; echo $CLIENT_ID; echo $CLIENT_SECRET; echo $TENANT_ID
```
If any of those variables are missing their value, refer to the [previous step](https://developer.hashicorp.com/vault/tutorials/secrets-management/azure-secrets?variants=vault-deploy%3Aselfhosted#create-an-azure-service-principal-and-resource-group) and set them before proceeding.
{% tabs %}
{% tab title="CLI command" %}
Configure the Azure secrets engine with the Azure credentials.
```shell-session
$ vault write azure/config \
subscription_id=$SUBSCRIPTION_ID \
client_id=$CLIENT_ID \
client_secret=$CLIENT_SECRET \
tenant_id=$TENANT_ID \
use_microsoft_graph_api=true
```
{% endtab %}
{% tab title="API call using cURL" %}
1. Create an API request payload containing the Azure credentials.
```shell-session
$ tee payload.json <
(**Persona:** admin)
A Vault role lets you configure either an existing service principal or a set of Azure roles.
{% tabs %}
{% tab title="CLI command" %}
Create a Vault role named, `edu-app` mapped to the Azure role named, `Contributor` in the `vault-education` resource group.
```shell-session
$ vault write azure/roles/edu-app ttl=1h azure_roles=-<
The role generates credentials with a time-to-live (TTL) of 1 hour and max TTL of 24 hours.
{% tabs %}
{% tab title="CLI command" %}
1. Read credentials from the `edu-app` azure role.
```shell-session
$ vault read azure/creds/edu-app
```
**Example output:**
```plaintext
Key Value
--- -----
lease_id azure/creds/edu-app/EA2uTB98qAPR2BRSaasnmnja
lease_duration 1h
lease_renewable true
client_id 074421c4-60b7-477c-9c5f-07e0925ba6a6
client_secret Vw17Q~3u3ZRRUd.M4pP-Bl487.i4Fe1~jLpLT
```
The results display the credentials, its TTL, and the lease ID.
2. For applications ([apps persona](https://developer.hashicorp.com/vault/tutorials/secrets-management/azure-secrets?variants=vault-deploy%3Aselfhosted#personas)) to request credentials, it requires a Vault policy that grants access to this role. Define a policy named `apps`.
```shell-session
$ vault policy write apps - <_`) to open a command shell.
6. Execute `vault write auth/token/create policies=apps` in the CLI shell to create a new token:
5. Click **Review + create**.
The view changes to display the review page.
6. Click **Create**.
The resource group `vault-education` is created.
### Configure Vault
With the necessary resources configured in Azure, you can configure the Azure secrets engine to dynamically generate Azure service principals.
#### Enable the Azure secrets engine
{% tabs %}
{% tab title="CLI command" %}
Enable the azure secrets engine at its default path.
```shell-session
$ vault secrets enable azure
```
The secrets engine is enabled at the path `azure/`. To enable the secrets engine at a different path requires that you use the `-path` parameter and the desired path.
{% endtab %}
{% tab title="API call using cURL" %}
Enable the azure secrets engine at the path named `azure`.
```shell-session
$ curl --header "X-Vault-Token: $VAULT_TOKEN" \
--request POST \
--data '{"type":"azure"}' \
$VAULT_ADDR/v1/sys/mounts/azure
```
The `data` field defines the type, `{"type":"azure"}`, of secrets engine to enable. The requested URL, `/v1/sys/mounts/azure`, defines the path of the secrets engine.
Note:
Additional [configuration parameters](https://developer.hashicorp.com/vault/api-docs/system/mounts#enable-secrets-engine) may be provided to configure the secrets engine. The path as well may be modified to support your needs.
{% endtab %}
{% tab title="Web UI" %}
1. Open a web browser and launch the Vault UI (e.g. `http://127.0.0.1:8200/ui`) and then login.
2. Select **Enable new engine**.
3. Select **Azure** from the list, and then click **Next**.
4. Click **Enable Engine** to complete. This sets the path to be `azure`.
**Note:**
In this tutorial, the azure secrets engine is enabled at the `/azure` path in Vault. However, it is possible to enable your secret engines at any location by entering your desired path in the **Path** text field.
{% endtab %}
{% endtabs %}
#### Configure the Azure secrets engine
(**Persona:** admin)
The Azure secrets engine requires the credentials you generated in the create an Azure service principal and resource group step to communicate with Azure and generate service principals.
Verify that your Azure subscription ID, client ID, client ID, and tenant ID are stored as environment variables.
```shell-session
$ echo $SUBSCRIPTION_ID; echo $CLIENT_ID; echo $CLIENT_SECRET; echo $TENANT_ID
```
If any of those variables are missing their value, refer to the [previous step](https://developer.hashicorp.com/vault/tutorials/secrets-management/azure-secrets?variants=vault-deploy%3Aselfhosted#create-an-azure-service-principal-and-resource-group) and set them before proceeding.
{% tabs %}
{% tab title="CLI command" %}
Configure the Azure secrets engine with the Azure credentials.
```shell-session
$ vault write azure/config \
subscription_id=$SUBSCRIPTION_ID \
client_id=$CLIENT_ID \
client_secret=$CLIENT_SECRET \
tenant_id=$TENANT_ID \
use_microsoft_graph_api=true
```
{% endtab %}
{% tab title="API call using cURL" %}
1. Create an API request payload containing the Azure credentials.
```shell-session
$ tee payload.json <
(**Persona:** admin)
A Vault role lets you configure either an existing service principal or a set of Azure roles.
{% tabs %}
{% tab title="CLI command" %}
Create a Vault role named, `edu-app` mapped to the Azure role named, `Contributor` in the `vault-education` resource group.
```shell-session
$ vault write azure/roles/edu-app ttl=1h azure_roles=-<
The role generates credentials with a time-to-live (TTL) of 1 hour and max TTL of 24 hours.
{% tabs %}
{% tab title="CLI command" %}
1. Read credentials from the `edu-app` azure role.
```shell-session
$ vault read azure/creds/edu-app
```
**Example output:**
```plaintext
Key Value
--- -----
lease_id azure/creds/edu-app/EA2uTB98qAPR2BRSaasnmnja
lease_duration 1h
lease_renewable true
client_id 074421c4-60b7-477c-9c5f-07e0925ba6a6
client_secret Vw17Q~3u3ZRRUd.M4pP-Bl487.i4Fe1~jLpLT
```
The results display the credentials, its TTL, and the lease ID.
2. For applications ([apps persona](https://developer.hashicorp.com/vault/tutorials/secrets-management/azure-secrets?variants=vault-deploy%3Aselfhosted#personas)) to request credentials, it requires a Vault policy that grants access to this role. Define a policy named `apps`.
```shell-session
$ vault policy write apps - <_`) to open a command shell.
6. Execute `vault write auth/token/create policies=apps` in the CLI shell to create a new token:
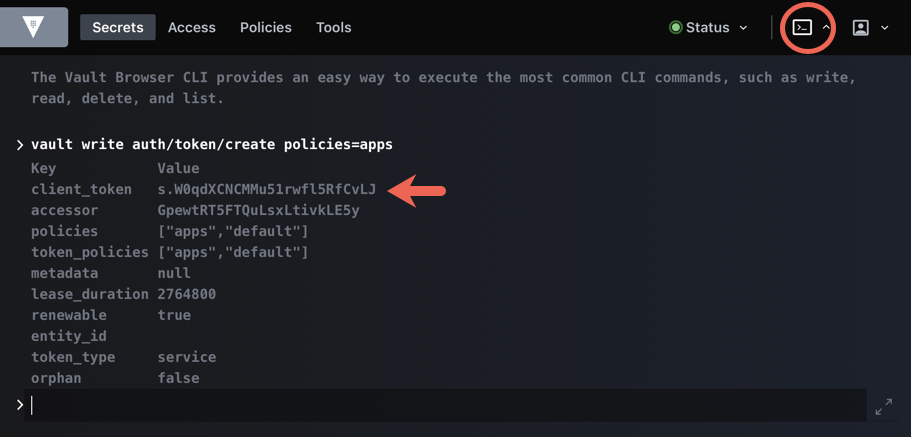 7. Copy and save the generated client token value.
8. Sign out of the Vault UI.
9. Now, sign into the Vault using the newly generated token you just copied.
10. Click the Vault CLI shell icon (`>_`) to open a command shell. Execute `vault read azure/creds/edu-app` in the CLI shell.
{% endtab %}
{% endtabs %}
The results display the credentials, its TTL, and the lease ID. The credentials for this application (service principal) in the Azure Portal searching by its `client_id`.
**Note:** Re-run the command and notice that the role returns a new set of credentials. This means that each app instance acquires a unique set of Azure credentials.
### Manage leases
(**Persona:** admin)
The credentials are managed by the lease ID and remain valid for the lease duration (TTL) or until revoked. Once revoked the credentials are no longer valid.
{% tabs %}
{% tab title="CLI command" %}
List the existing leases.
```shell-session
$ vault list sys/leases/lookup/azure/creds/edu-app
```
**Example output:**
```plaintext
Keys
----
o2F4EA3hU8Fpjgc39XyQpjtU
fRFeCtlMnoPqelTrjf5j5kGA
```
All valid leases for Azure credentials are displayed.
Create a variable that stores the first lease ID.
```shell-session
$ LEASE_ID=$(vault list -format=json sys/leases/lookup/azure/creds/edu-app | jq -r ".[0]")
```
#### Renew a lease
If you need to extend the use of the generated Azure credentials, you can renew the lease by passing its lease ID.
```shell-session
$ vault lease renew azure/creds/edu-app/$LEASE_ID
```
**Example output:**
```plaintext
Key Value
--- -----
lease_id azure/creds/edu-app/EA2uTB98qAPR2BRSaasnmnja
lease_duration 1h
lease_renewable true
```
The TTL of the renewed lease is set to `1h`.
#### Revoke the leases
When the Azure credentials are no longer needed, you can revoke the lease without waiting for its expiration.
1. Revoke the least associated with the $LEASE\_ID environment variable.
```shell-session
$ vault lease revoke azure/creds/edu-app/$LEASE_ID
All revocation operations queued successfully!
```
2. List the existing leases.
```shell-session
$ vault list sys/leases/lookup/azure/creds/edu-app
fRFeCtlMnoPqelTrjf5j5kGA
```
The first lease is no longer valid.
3. Read new credentials from the `edu-app` role.
```shell-session
$ vault read azure/creds/edu-app
```
4. Revoke **all** the leases with the prefix `azure/creds/edu-app`.
```shell-session
$ vault lease revoke -prefix azure/creds/edu-app
```
The `prefix` flag matches all valid leases with the path prefix of `azure/creds/edu-app`.
5. List the existing leases.
```shell-session
$ vault list sys/leases/lookup/azure/creds/edu-app
No value found at sys/leases/lookup/azure/creds/edu-app
```
All the leases with this path as a prefix have been revoked.
{% endtab %}
{% tab title="API call using cURL" %}
List the existing lease IDs.
```shell-session
$ curl --header "X-Vault-Token: $VAULT_TOKEN" \
--request LIST \
$VAULT_ADDR/v1/sys/leases/lookup/azure/creds/edu-app | jq -r ".data.keys"
```
All valid leases for Azure credentials are displayed.
**Example output:**
```json
[
"w8KAdJGYmN4ysZVFHPgl6psT",
"zKl9iK07Yf5qZtmg7qcM5Tgg"
]
```
Create a variable that stores the first (and only) lease ID.
```shell-session
$ LEASE_ID=$(curl --header "X-Vault-Token: $VAULT_TOKEN" \
--request LIST \
$VAULT_ADDR/v1/sys/leases/lookup/azure/creds/edu-app | jq -r ".data.keys[0]")
```
#### Renew a lease
If you need to extend the use of the generated Azure credentials, you can renew the lease by passing its lease ID.
```shell-session
$ curl --header "X-Vault-Token: $VAULT_TOKEN" \
--request PUT \
--data "{ \"lease_id\": \"azure/creds/edu-app/$LEASE_ID\" }" \
$VAULT_ADDR/v1/sys/leases/renew | jq
```
The TTL of the renewed lease is set to `1h`.
**Example output:**
```json
{
"request_id": "7dee4bd8-73b6-f7f0-693f-78d3d38aef5c",
"lease_id": "azure/creds/edu-app/w8KAdJGYmN4ysZVFHPgl6psT",
"renewable": true,
"lease_duration": 3600,
"data": null,
"wrap_info": null,
"warnings": null,
"auth": null
}
```
#### Revoke the leases
When the Azure credentials are no longer needed, you can revoke the lease without waiting for its expiration.
Revoke the lease without waiting for its expiration.
```shell-session
$ curl --header "X-Vault-Token: $VAULT_TOKEN" \
--request PUT \
--data "{ \"lease_id\": \"azure/creds/edu-app/$LEASE_ID\" }" \
$VAULT_ADDR/v1/sys/leases/revoke
```
List the existing leases.
```shell-session
$ curl --header "X-Vault-Token: $VAULT_TOKEN" \
--request LIST \
$VAULT_ADDR/v1/sys/leases/lookup/azure/creds/edu-app | jq -r ".data.keys"
```
**Example output:**
```json
[
"zKl9iK07Yf5qZtmg7qcM5Tgg"
]
```
The deleted lease is no longer valid and is not displayed.
Read new credentials from the `edu-app` role.
```shell-session
$ curl --header "X-Vault-Token: $VAULT_TOKEN" \
--request GET \
$VAULT_ADDR/v1/azure/creds/edu-app | jq -r ".data"
```
Revoke **all** the leases with the prefix `azure/creds/edu-app`.
```shell-session
$ curl --header "X-Vault-Token: $VAULT_TOKEN" \
--request PUT \
$VAULT_ADDR/v1/sys/leases/revoke-prefix/azure/creds/edu-app
```
List the existing leases.
```shell-session
$ curl --header "X-Vault-Token: $VAULT_TOKEN" \
--request LIST \
$VAULT_ADDR/v1/sys/leases/lookup/azure/creds/edu-app | jq
```
All the leases with this path as a prefix have been revoked; therefore, it returns an empty array.
```json
{
"errors": []
}
```
{% endtab %}
{% endtabs %}
### Clean up
The Azure credentials created to configure the secrets engine should be deleted if they are no longer required.
1. Launch the [Microsoft Azure Portal](https://portal.azure.com/) and sign in.
2. Navigate to [Azure Active Directory](https://portal.azure.com/#blade/Microsoft_AAD_IAM/ActiveDirectoryMenuBlade/Overview).
3. From the side navigation, select **App registrations**.
4. Click the **vault-education** application (or whatever the name you set for the application).
5. From the application overview, click **delete**.
6. Select **Yes** to delete the application. The application is deleted.
7. Navigate to [Resource groups](https://portal.azure.com/#blade/HubsExtension/BrowseResourceGroups).
8. Click the **vault-education** resource group.
9. From the resource group overview, click **Delete resource group**.
10. Enter `vault-education` in the `TYPE THE RESOURCE GROUP NAME:` field.
11. Click **Delete**. The resource group is deleted.
#### Stop the Vault server
1. Unset the `VAULT_TOKEN` environment variable.
```shell-session
$ unset VAULT_TOKEN
```
2. Unset the `VAULT_ADDR` environment variable.
```shell-session
$ unset VAULT_ADDR
```
3. If you are running Vault locally in `dev` mode, stop the Vault dev server by pressing **Ctrl+C** where the server is running. Or, execute the following command.
```shell-session
$ pgrep -f vault | xargs kill
```
---
# Agent Instructions
This documentation is published with GitBook. GitBook is the documentation platform designed so that both humans and AI agents can read, navigate, and reason over technical content effectively. Learn more at gitbook.com.
## Querying This Documentation
If you need additional information that is not directly available in this page, you can query the documentation dynamically by asking a question.
Perform an HTTP GET request on the current page URL with the `ask` query parameter, and the optional `goal` query parameter:
```
GET https://docs.enclaive.cloud/vault/tutorials/use-cases/dynamic-credentials-for-cloud-providers/azure.md?ask=&goal=
```
`ask` is the immediate question: it should be specific, self-contained, and written in natural language.
`goal` is optional and describes the broader end goal you are ultimately trying to accomplish on behalf of the user. GitBook uses it to tailor the answer towards what is most useful for that goal.
The response will contain a direct answer to the question and relevant excerpts and sources from the documentation.
Use this mechanism when the answer is not explicitly present in the current page, you need clarification or additional context, or you want to retrieve related documentation sections.
7. Copy and save the generated client token value.
8. Sign out of the Vault UI.
9. Now, sign into the Vault using the newly generated token you just copied.
10. Click the Vault CLI shell icon (`>_`) to open a command shell. Execute `vault read azure/creds/edu-app` in the CLI shell.
{% endtab %}
{% endtabs %}
The results display the credentials, its TTL, and the lease ID. The credentials for this application (service principal) in the Azure Portal searching by its `client_id`.
**Note:** Re-run the command and notice that the role returns a new set of credentials. This means that each app instance acquires a unique set of Azure credentials.
### Manage leases
(**Persona:** admin)
The credentials are managed by the lease ID and remain valid for the lease duration (TTL) or until revoked. Once revoked the credentials are no longer valid.
{% tabs %}
{% tab title="CLI command" %}
List the existing leases.
```shell-session
$ vault list sys/leases/lookup/azure/creds/edu-app
```
**Example output:**
```plaintext
Keys
----
o2F4EA3hU8Fpjgc39XyQpjtU
fRFeCtlMnoPqelTrjf5j5kGA
```
All valid leases for Azure credentials are displayed.
Create a variable that stores the first lease ID.
```shell-session
$ LEASE_ID=$(vault list -format=json sys/leases/lookup/azure/creds/edu-app | jq -r ".[0]")
```
#### Renew a lease
If you need to extend the use of the generated Azure credentials, you can renew the lease by passing its lease ID.
```shell-session
$ vault lease renew azure/creds/edu-app/$LEASE_ID
```
**Example output:**
```plaintext
Key Value
--- -----
lease_id azure/creds/edu-app/EA2uTB98qAPR2BRSaasnmnja
lease_duration 1h
lease_renewable true
```
The TTL of the renewed lease is set to `1h`.
#### Revoke the leases
When the Azure credentials are no longer needed, you can revoke the lease without waiting for its expiration.
1. Revoke the least associated with the $LEASE\_ID environment variable.
```shell-session
$ vault lease revoke azure/creds/edu-app/$LEASE_ID
All revocation operations queued successfully!
```
2. List the existing leases.
```shell-session
$ vault list sys/leases/lookup/azure/creds/edu-app
fRFeCtlMnoPqelTrjf5j5kGA
```
The first lease is no longer valid.
3. Read new credentials from the `edu-app` role.
```shell-session
$ vault read azure/creds/edu-app
```
4. Revoke **all** the leases with the prefix `azure/creds/edu-app`.
```shell-session
$ vault lease revoke -prefix azure/creds/edu-app
```
The `prefix` flag matches all valid leases with the path prefix of `azure/creds/edu-app`.
5. List the existing leases.
```shell-session
$ vault list sys/leases/lookup/azure/creds/edu-app
No value found at sys/leases/lookup/azure/creds/edu-app
```
All the leases with this path as a prefix have been revoked.
{% endtab %}
{% tab title="API call using cURL" %}
List the existing lease IDs.
```shell-session
$ curl --header "X-Vault-Token: $VAULT_TOKEN" \
--request LIST \
$VAULT_ADDR/v1/sys/leases/lookup/azure/creds/edu-app | jq -r ".data.keys"
```
All valid leases for Azure credentials are displayed.
**Example output:**
```json
[
"w8KAdJGYmN4ysZVFHPgl6psT",
"zKl9iK07Yf5qZtmg7qcM5Tgg"
]
```
Create a variable that stores the first (and only) lease ID.
```shell-session
$ LEASE_ID=$(curl --header "X-Vault-Token: $VAULT_TOKEN" \
--request LIST \
$VAULT_ADDR/v1/sys/leases/lookup/azure/creds/edu-app | jq -r ".data.keys[0]")
```
#### Renew a lease
If you need to extend the use of the generated Azure credentials, you can renew the lease by passing its lease ID.
```shell-session
$ curl --header "X-Vault-Token: $VAULT_TOKEN" \
--request PUT \
--data "{ \"lease_id\": \"azure/creds/edu-app/$LEASE_ID\" }" \
$VAULT_ADDR/v1/sys/leases/renew | jq
```
The TTL of the renewed lease is set to `1h`.
**Example output:**
```json
{
"request_id": "7dee4bd8-73b6-f7f0-693f-78d3d38aef5c",
"lease_id": "azure/creds/edu-app/w8KAdJGYmN4ysZVFHPgl6psT",
"renewable": true,
"lease_duration": 3600,
"data": null,
"wrap_info": null,
"warnings": null,
"auth": null
}
```
#### Revoke the leases
When the Azure credentials are no longer needed, you can revoke the lease without waiting for its expiration.
Revoke the lease without waiting for its expiration.
```shell-session
$ curl --header "X-Vault-Token: $VAULT_TOKEN" \
--request PUT \
--data "{ \"lease_id\": \"azure/creds/edu-app/$LEASE_ID\" }" \
$VAULT_ADDR/v1/sys/leases/revoke
```
List the existing leases.
```shell-session
$ curl --header "X-Vault-Token: $VAULT_TOKEN" \
--request LIST \
$VAULT_ADDR/v1/sys/leases/lookup/azure/creds/edu-app | jq -r ".data.keys"
```
**Example output:**
```json
[
"zKl9iK07Yf5qZtmg7qcM5Tgg"
]
```
The deleted lease is no longer valid and is not displayed.
Read new credentials from the `edu-app` role.
```shell-session
$ curl --header "X-Vault-Token: $VAULT_TOKEN" \
--request GET \
$VAULT_ADDR/v1/azure/creds/edu-app | jq -r ".data"
```
Revoke **all** the leases with the prefix `azure/creds/edu-app`.
```shell-session
$ curl --header "X-Vault-Token: $VAULT_TOKEN" \
--request PUT \
$VAULT_ADDR/v1/sys/leases/revoke-prefix/azure/creds/edu-app
```
List the existing leases.
```shell-session
$ curl --header "X-Vault-Token: $VAULT_TOKEN" \
--request LIST \
$VAULT_ADDR/v1/sys/leases/lookup/azure/creds/edu-app | jq
```
All the leases with this path as a prefix have been revoked; therefore, it returns an empty array.
```json
{
"errors": []
}
```
{% endtab %}
{% endtabs %}
### Clean up
The Azure credentials created to configure the secrets engine should be deleted if they are no longer required.
1. Launch the [Microsoft Azure Portal](https://portal.azure.com/) and sign in.
2. Navigate to [Azure Active Directory](https://portal.azure.com/#blade/Microsoft_AAD_IAM/ActiveDirectoryMenuBlade/Overview).
3. From the side navigation, select **App registrations**.
4. Click the **vault-education** application (or whatever the name you set for the application).
5. From the application overview, click **delete**.
6. Select **Yes** to delete the application. The application is deleted.
7. Navigate to [Resource groups](https://portal.azure.com/#blade/HubsExtension/BrowseResourceGroups).
8. Click the **vault-education** resource group.
9. From the resource group overview, click **Delete resource group**.
10. Enter `vault-education` in the `TYPE THE RESOURCE GROUP NAME:` field.
11. Click **Delete**. The resource group is deleted.
#### Stop the Vault server
1. Unset the `VAULT_TOKEN` environment variable.
```shell-session
$ unset VAULT_TOKEN
```
2. Unset the `VAULT_ADDR` environment variable.
```shell-session
$ unset VAULT_ADDR
```
3. If you are running Vault locally in `dev` mode, stop the Vault dev server by pressing **Ctrl+C** where the server is running. Or, execute the following command.
```shell-session
$ pgrep -f vault | xargs kill
```
---
# Agent Instructions
This documentation is published with GitBook. GitBook is the documentation platform designed so that both humans and AI agents can read, navigate, and reason over technical content effectively. Learn more at gitbook.com.
## Querying This Documentation
If you need additional information that is not directly available in this page, you can query the documentation dynamically by asking a question.
Perform an HTTP GET request on the current page URL with the `ask` query parameter, and the optional `goal` query parameter:
```
GET https://docs.enclaive.cloud/vault/tutorials/use-cases/dynamic-credentials-for-cloud-providers/azure.md?ask=&goal=
```
`ask` is the immediate question: it should be specific, self-contained, and written in natural language.
`goal` is optional and describes the broader end goal you are ultimately trying to accomplish on behalf of the user. GitBook uses it to tailor the answer towards what is most useful for that goal.
The response will contain a direct answer to the question and relevant excerpts and sources from the documentation.
Use this mechanism when the answer is not explicitly present in the current page, you need clarification or additional context, or you want to retrieve related documentation sections.