> For the complete documentation index, see [llms.txt](https://docs.enclaive.cloud/vault/llms.txt). Markdown versions of documentation pages are available by appending `.md` to page URLs; this page is available as [Markdown](https://docs.enclaive.cloud/vault/tutorials/use-cases/dynamic-credentials-for-cloud-providers/gcp.md).
# GCP
Dynamic secrets are a core feature in Vault. A class of dynamic secrets is on-demand, revocable, time-limited access credentials for cloud providers.
### Challenge
To consume Google Cloud Platform (GCP) services (e.g. GCP Kubernetes service), the client must have valid GCP credentials. GCP uses [**service accounts**](https://cloud.google.com/iam/docs/service-accounts) to authenticate services running in GCP with other GCP services. For example, a compute engine virtual machine (VM) requires credentials to authenticate with other GCP services.
### Solution
Configure Vault to generate service account keys or OAuth tokens with a time-to-live (TTL) enforcing its validity so that the credentials are automatically revoked when they are no longer used.
In this tutorial, you will configure GCP to support Vault and setup Vault to generate either a OAuth token or service account key.
### Personas
The end-to-end scenario described in this tutorial involves two personas:
* `admin` with privileged permissions to configure Vault secrets engines and GCP resources
* `apps` read the secrets from Vault
### Prerequisites
This tutorial assumes the following:
* You have a Google Cloud Platform account with permission to:
* Create IAM service accounts, policies
* Enable GCP APIs
* Access the GCP Cloud Shell
* Create VMs
* Vault installed on your local machine
* [jq](https://stedolan.github.io/jq/download/) installed
#### Policy requirements
Each persona requires a different set of capabilities. These are expressed in policies. If you are not familiar with policies, complete the policies tutorial.
Required Vault policies
### Lab setup
#### Workstation setup
1. Create a temporary directory to store the files used for this tutorial.
```shell-session
$ mkdir ~/TUTORIAL_TEMP
```
2. Retrieve the directory path and store it in the `TUTORIAL_TEMP` environment variable.
```shell-session
$ TUTORIAL_TEMP=$(echo ~/TUTORIAL_TEMP)
```
3. Go to the `TUTORIAL_TEMP` directory.
```shell-session
$ cd $TUTORIAL_TEMP
```
#### Vault setup
1. Open **a new terminal window** and start a Vault dev server with `root` as the root token.
```shell-session
$ vault server -dev -dev-root-token-id root
```
The Vault dev server defaults to running at `127.0.0.1:8200`. The server is initialized and unsealed.
{% hint style="danger" %}
Insecure operation:
Do not run a Vault dev server in production. This approach starts a Vault server with an in-memory database and runs in an insecure way.
{% endhint %}
2. Return to the terminal where you created the `TUTORIAL_TEMP` directory.
3. Export an environment variable for the `vault` CLI to address the Vault server.
```shell-session
$ export VAULT_ADDR=http://127.0.0.1:8200
```
4. Export an environment variable for the `vault` CLI to authenticate with the Vault server.
```shell-session
$ export VAULT_TOKEN=root
```
{% hint style="info" %}
Note: For these tasks, you can use Vault's *root* token. However, it is recommended that root tokens are only used for enough initial setup or in emergencies. As a best practice, use an authentication method or token that meets the policy requirements.
{% endhint %}
The Vault server is ready.
### Configure GCP services for Vault
(**Persona:** admin)
{% hint style="warning" %}
**Warning:**
Resources will be provisioned during this tutorial that may result in charges to your Google Cloud Platform account.
{% endhint %}
Before Vault can manage dynamic credentials using the GCP secrets engine, you need to configure the necessary resources in GCP. This includes enabling the required GCP APIs, creating a IAM service account and IAM policy for Vault, and a creating key for the service account that Vault will use to authenticate with GCP.
1. Open a browser and sign into the [GCP console](https://console.cloud.google.com/).
2. Click the terminal icon to launch the GCP Cloud Shell.
A new pane will open at the bottom of your window and provision a Cloud Shell instance.
3. In the Cloud Shell terminal, list the GCP project ID.
{% hint style="info" %}
**Note:**
If this is the first time using the Cloud Shell terminal, you will be prompted to authorize permission to use your credentials.
Click `Authorize` when prompted.
{% endhint %}
```shell-session
$ gcloud projects list
PROJECT_ID: abc-123defde860044c59e853ee2819
NAME: my-gcp-account-name
PROJECT_NUMBER: 85527753462
```
The project ID is used when configuring both GCP and Vault.
4. Verify the cloud resource manager and IAM API's are enabled.
```shell-session
$ gcloud services list --enabled | grep 'resource\|iam'
NAME: cloudresourcemanager.googleapis.com
NAME: iam.googleapis.com
NAME: iamcredentials.googleapis.com
```
If `cloudresourcemanager.googleapis.com` and `iam.googleapis.com` are not listed, expand the menu below and enable the API(s).
Enable GCP APIs:
Enable the `iam.googleapis.com` API.
```shell-session
$ gcloud services enable iam.googleapis.com
```
Enable the `cloudresourcemanager.googleapis.com` API.
```shell-session
$ gcloud services enable cloudresourcemanager.googleapis.com
```
5. Create a service account for Vault to authenticate with GCP.
```shell-session
$ gcloud iam service-accounts create \
VaultServiceAccount \
--display-name="VaultServiceAccount"
```
6. Create a GCP IAM role for Vault and assign the required permissions.
```shell-session
$ gcloud iam roles create VaultServiceRole \
--project=$DEVSHELL_PROJECT_ID \
--title=VaultServiceRole \
--stage=GA \
--permissions=iam.serviceAccounts.create,iam.serviceAccounts.delete,iam.serviceAccounts.get,iam.serviceAccounts.list,iam.serviceAccounts.update,iam.serviceAccountKeys.create,iam.serviceAccountKeys.delete,iam.serviceAccountKeys.get,iam.serviceAccountKeys.list,iam.serviceAccounts.getAccessToken,resourcemanager.projects.getIamPolicy,resourcemanager.projects.setIamPolicy
```
7. Retrieve the role name and store it in the `ROLE_NAME` environment variable.
```shell-session
$ ROLE_NAME=$(gcloud iam roles list --project=$DEVSHELL_PROJECT_ID --format=json --filter="vault" | jq -r .[].name)
```
8. Retrieve the service account email and store it in the `SERVICE_ACCOUNT` environment variable.
```shell-session
$ SERVICE_ACCOUNT=$(gcloud iam service-accounts list --project=$DEVSHELL_PROJECT_ID --filter=vault --format=json | jq -r .[].email)
```
9. Add the Vault service account to the GCP project and bind the role to the service account.
```shell-session
$ gcloud projects add-iam-policy-binding $DEVSHELL_PROJECT_ID \
--member="serviceAccount:$SERVICE_ACCOUNT" \
--role="$ROLE_NAME"
```
10. Create a service account key credential file.
```shell-session
$ gcloud iam service-accounts keys create VaultServiceAccountKey.json \
--iam-account=$SERVICE_ACCOUNT \
--project=$DEVSHELL_PROJECT_ID
```
11. Click the More button (represented by the vertical ellipsis) and select **Download**.
12. Click the folder icon, expand the directory, select the **VaultServiceAccountKey.json** file, and click **Download**.
13. Store the `VaultServiceAccountKey.json` file in `TUTORIAL_TEMP` directory you created in the [lab setup](https://developer.hashicorp.com/vault/tutorials/secrets-management/gcp-secrets-engine#lab-setup) section.
{% hint style="info" %}
Tip
Depending on your browser settings, the file may automatically download to a default directory. To complete this tutorial, make sure the `VaultServiceAccountKey.json` file is located in the `$TUTORIAL_TEMP` directory.
{% endhint %}
**Example OSX command:**
```shell-session
$ mv ~/Downloads/VaultServiceAccountKey.json $TUTORIAL_TEMP/
```
14. Retrieve and copy the GCP project ID from the Cloud Shell terminal.
```shell-session
$ echo $DEVSHELL_PROJECT_ID
```
15. Return to the terminal where you set the `TUTORIAL_TEMP` environment variable and set the `GCP_PROJECT_ID` environment variable to the value from the previous step.
```shell-session
$ export GCP_PROJECT_ID=
```
You have completed the necessary configuration in GCP to support the Vault GCP secrets engine.
### Configure Vault
(**Persona:** admin)
There are two types of credentials Vault can generate for GCP - a JSON formated service account key credential file, and an OAuth token. Each of these methods have benefits and contrstraints that need to be considered for your use case.
Service account keys have a limit of ten keys per service account. This limit can quickly be reached in large, or busy environments. Depending on the workload, this limitation can be managed by setting a low TTL that permits the workload to complete. Service keys, however, are supported across most clients and the lifetime of the key can be fully managed by Vault.
OAuth access tokens do not have any limits on the number of tokens that can be requested. This can be beneficial for large environments or when workloads have a long runtime because you will not reach the same limit as service account keys. OAuth tokens are not supported by all clients and Vault is not able to fully manage the token. All tokens have a default TTL of one hour and cannot be revoked by Vault.
Impersonated accounts are a way to generate an OAuth2 access token that is granted the permissions and accesses of another given service account. These access tokens do not have the same 10-key limit as service account keys do, yet they retain their short-lived nature.
Instead of Vault creating a unique service account in GCP based on the Vault roleset name, existing GCP service accounts can be impersonated to simplify the configuration. This will help alleviate reaching the [100 service account quota](https://cloud.google.com/iam/quotas#quotas) in GCP.
See the **OAuth account impersonation** tab below for more details.
{% tabs %}
{% tab title="OAuth token" %}
1. In the terminal where you set the `TUTORIAL_TEMP` environment variable, enable the GCP secrets engine.
```shell-session
$ vault secrets enable gcp
Success! Enabled the gcp secrets engine at: gcp/
```
2. Configure the GCP secrets engine to use the `VaultServiceAccountKey.json` credentials.
```shell-session
$ vault write gcp/config \
ttl="2m" \
max_ttl="10m" \
credentials=@$TUTORIAL_TEMP/VaultServiceAccountKey.json
```
**Example output:**
```plaintext
Success! Data written to: gcp/config
```
3. Define the bindings to be used by Vault in a file named `gcpbindings.hcl`.
```shell-session
$ tee $TUTORIAL_TEMP/gcpbindings.hcl <> **Service Accounts**.
3. Copy the full email address for the **VaultServiceAccount** ending with **iam.gserviceaccount.com**.
4. In the terminal where you set the `TUTORIAL_TEMP` environment variable, create an environment variable with the service account email address.
```shell-session
$ export GCP_SERVICE_ACCT=
```
5. Enable the GCP secrets engine.
```shell-session
$ vault secrets enable gcp
Success! Enabled the gcp secrets engine at: gcp/
```
6. Configure the GCP secrets engine to use the `VaultServiceAccountKey.json` credentials.
```shell-session
$ vault write gcp/config \
ttl="2m" \
max_ttl="10m" \
credentials=@$TUTORIAL_TEMP/VaultServiceAccountKey.json
```
**Example output:**
```plaintext
Success! Data written to: gcp/config
```
7. Create a Vault roleset named `edu-app-impersonate`.
{% hint style="info" %}
Note
The `VaultServiceAccount` service account is used in this tutorial for simplicity. You can impersonate any service account in the GCP project that Vault authenticates to that provides the necessary permissions for the application.
{% endhint %}
```shell-session
$ vault write gcp/impersonated-account/impersonate-vault-service \
service_account_email="$GCP_SERVICE_ACCT" \
token_scopes="https://www.googleapis.com/auth/cloud-platform,https://www.googleapis.com/auth/compute" \
ttl="1h"
```
**Example output:**
```plaintext
Success! Data written to: gcp/impersonated-account/impersonate-vault-service
```
The Vault configuration is complete.
{% endtab %}
{% tab title="Service account key" %}
1. In the terminal where you set the `TUTORIAL_TEMP` environment variable, enable the GCP secrets engine.
```shell-session
$ vault secrets enable gcp
Success! Enabled the gcp secrets engine at: gcp/
```
2. Configure the GCP secrets engine to use the `VaultServiceAccountKey.json` credentials.
```shell-session
$ vault write gcp/config \
ttl="2m" \
max_ttl="10m" \
credentials=@$TUTORIAL_TEMP/VaultServiceAccountKey.json
```
**Example output:**
```plaintext
Success! Data written to: gcp/config
```
3. Define the bindings to be used by Vault in a file named `gcpbindings.hcl`.
```shell-session
$ tee $TUTORIAL_TEMP/gcpbindings.hcl <
(**Persona:** app)
{% tabs %}
{% tab title="OAuth token" %}
An application can read the Vault roleset to generate a unique OAuth token.
1. Read the `edu-app-token` roleset to generate a new token.
```shell-session
$ vault read gcp/roleset/edu-app-token/token
Key Value
--- -----
expires_at_seconds 1677772328
token ya29.c.b0Aaekm1JDyWPbVqy...snip...ccVteJkpyvRBbYbWqli5Oz
token_ttl 59m58s
```
The token is generated with the default TTL of one hour (60 minutes).
OAuth tokens are managed by GCP, and not visible in the GCP console.
2. Return to the GCP console.
3. Expand the hamburger menu and navigate to **IAM & Admin** >> **Service Accounts**.
4. A service account has been created in GCP based on the Vault role name `edu-app-token`.
5. Click the [**vaultedu-app-token123456789@..**](mailto:vaultedu-app-token123456789@..)**.** service account and click the **KEYS** tab.
6. The key ID associated with the service account key Vault created will be listed.
This key is required by the Vault node when it authenticates with GCP. If the token is deleted, the Vault node will not be able to authenticate with GCP and produce the following error:
```plaintext
Error reading gcp/roleset/edu-app-token/token: Error making API request.
Namespace: admin/
URL: GET https://vault-cluster-public-vault-bdac9bb2.40d0ceab.z1.hashicorp.cloud:8200/v1/gcp/roleset/edu-app-token/token
Code: 400. Errors:
* unable to generate token - make sure your roleset service account and key are still valid: got error while creating OAuth2 token: oauth2: cannot fetch token: 400 Bad Request
Response: {"error":"invalid_grant","error_description":"Invalid JWT Signature."}
```
 {% endtab %}
{% tab title="OAuth account impersonation" %}
An application can read the Vault roleset to impersonate a service account and generate a unique OAuth token.
1. Read the `edu-app-token` roleset to generate a new token.
```shell-session
$ vault read gcp/impersonated-account/impersonate-vault-service/token
Key Value
--- -----
expires_at_seconds 1677772328
token ya29.c.b0Aaekm1JDyWPbVqy...snip...ccVteJkpyvRBbYbWqli5Oz
token_ttl 10m
```
The token is generated with the TTL of ten minutes because the max TTL defined in the secrets engine configuration was set to 10m.
OAuth tokens are managed by GCP, and not visible in the GCP console.
{% endtab %}
{% tab title="Service account key" %}
An application can read the Vault roleset to generate a unique service account key.
1. Read the `edu-app` roleset to generate a new key.
```shell-session
$ vault read gcp/roleset/edu-app-key/key
Key Value
--- -----
lease_id gcp/roleset/edu-app-key/key/ra4SvjyYlp9udTrkCBnsK3Ky.RfmoS
lease_duration 2m
lease_renewable true
key_algorithm KEY_ALG_RSA_2048
key_type TYPE_GOOGLE_CREDENTIALS_FILE
private_key_data ewogICJ0eXBlIjogInNlcnZpY2VfY...snip...dmF0ZV9rZXlfaWQiOiAiMWIyNzViOG
```
The `lease_duration` is set to `2m` because the TTL defined in the secrets engine configuration was set to 2m.
They `private_key_data` value is a base64 encoded blob that has a properly formatted JSON file which the service can use to authenticate with GCP.
2. Generate a new key and base64 decode the `private_key_data` field to reveal the JSON formatted credential file.
```shell-session
$vault read --field private_key_data gcp/roleset/edu-app-key/key | base64 --decode
```
**Example output:**
```plaintext
{
"type": "service_account",
"project_id": "abc-123DEFb547c4b85ab06e16606d",
"private_key_id": "16f43c11931007f0131a2148a4add81ccd889ffd",
"private_key": "-----BEGIN PRIVATE KEY-----\nMIIEvQIBADCBKcwggSj...snip.../zL\nMmXo1ma5v8V4rPTAvkHNWbM=\n-----END PRIVATE KEY-----\n",
"client_email": "vaultedu-app-1677764256@abc-123DEF1b547c4b85ab06e16606d.iam.gserviceaccount.com",
"client_id": "109361234567891786547",
"auth_uri": "https://accounts.google.com/o/oauth2/auth",
"token_uri": "https://oauth2.googleapis.com/token",
"auth_provider_x509_cert_url": "https://www.googleapis.com/oauth2/v1/certs",
"client_x509_cert_url": "https://www.googleapis.com/robot/v1/metadata/x509/vaultedu-app-1677764256%40abc-123DEF1b547c4b85ab06e16606d.iam.gserviceaccount.com"
}
```
3. Return to the GCP console.
4. Expand the hamburger menu and navigate to **IAM & Admin** >> **Service Accounts**.
5. A service account has been created in GCP based on the Vault role name `edu-app-key`.
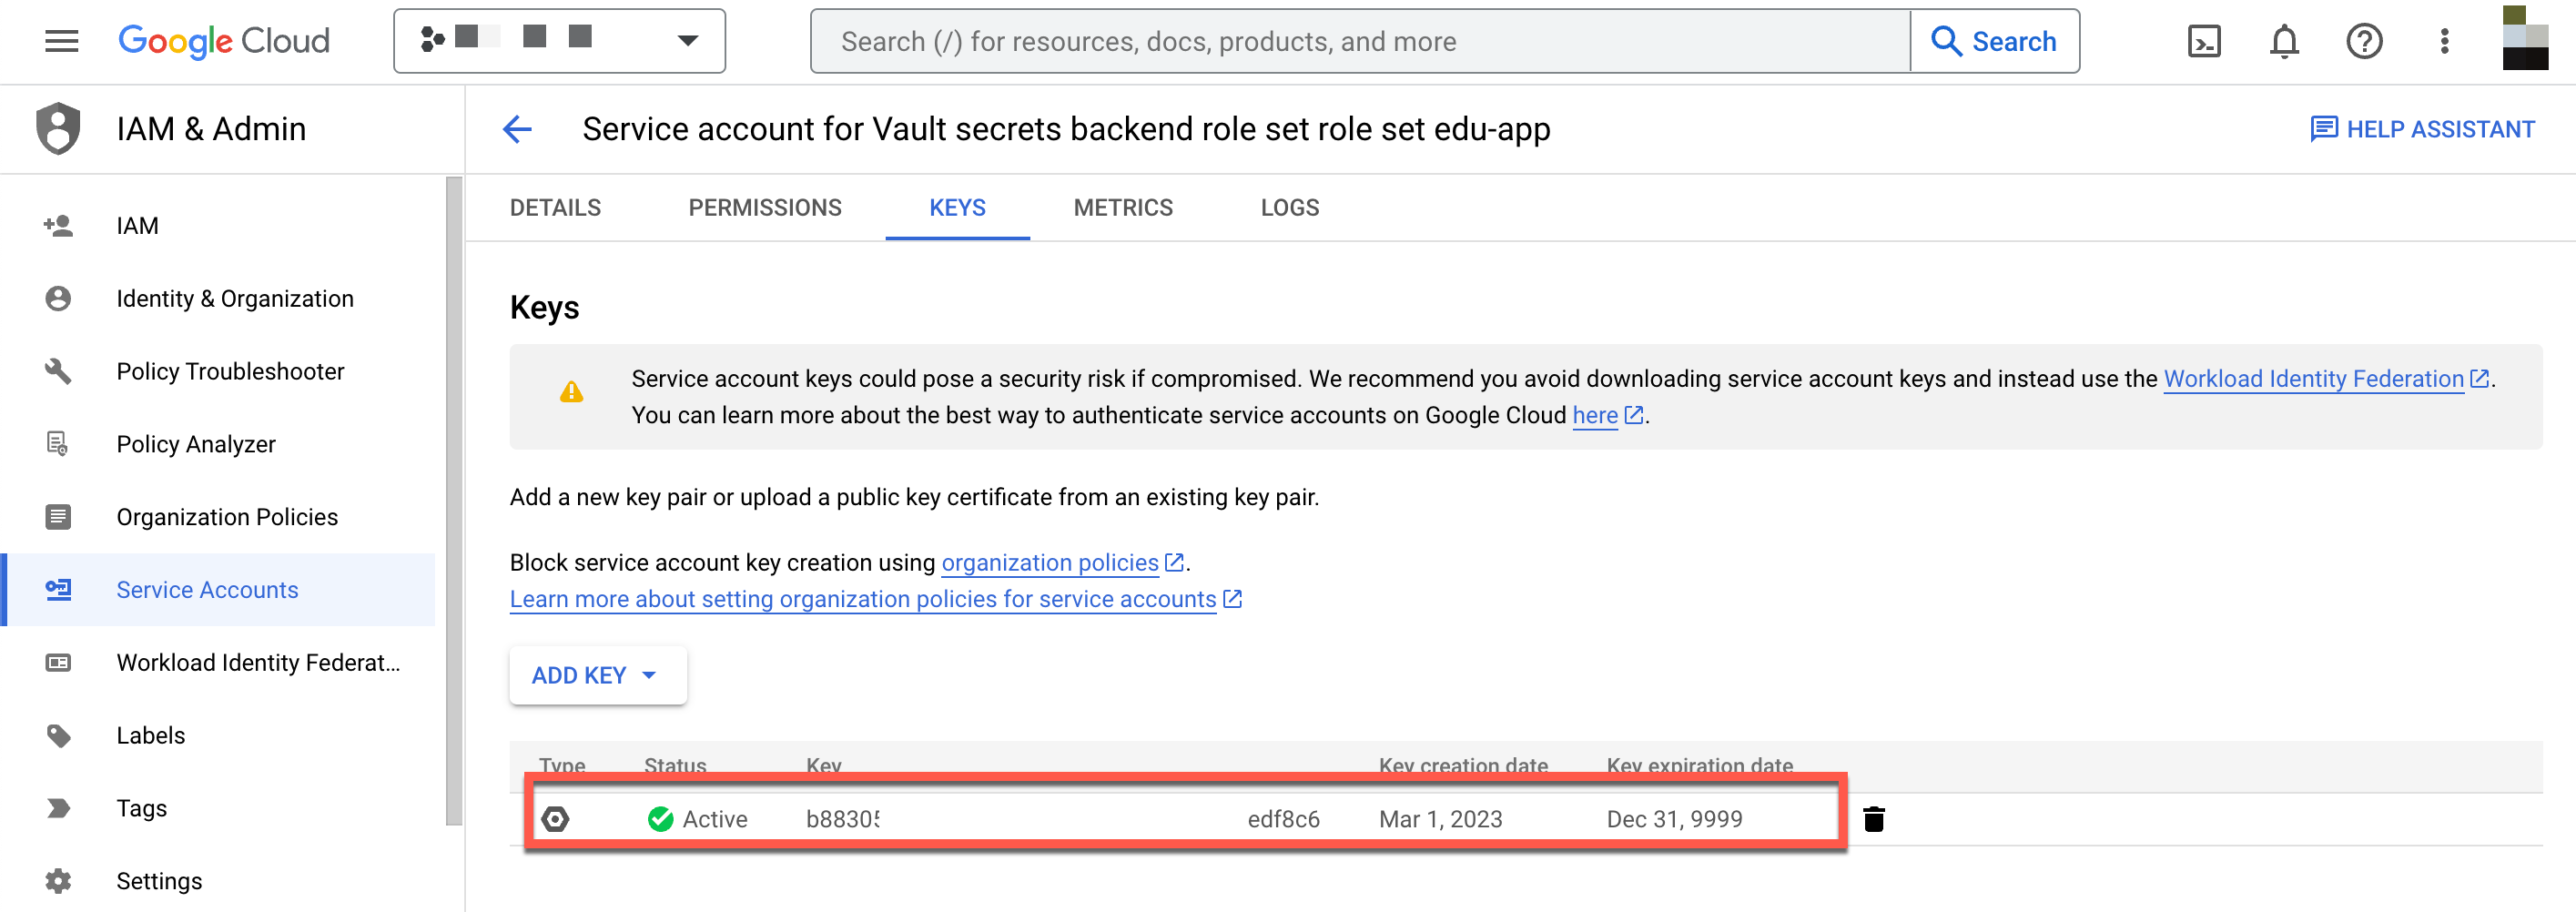
6. Click the [**vaultedu-app-key123456789@..**](mailto:vaultedu-app-key123456789@..)**.** service account and click the **KEYS** tab.
7. The key ID associated with the service account key you created will be listed.
8. Wait two minutes and refresh the page. They key ID is no longer listed because the TTL was set to two minutes and the key was revoked.
{% endtab %}
{% endtabs %}
### Manage leases
Service token eases can be renewed or revoked by either the requesting application or by a Vault admin.
{% hint style="info" %}
Note
OAuth tokens are not managed by Vault after creation; therefore, this step is applicable to only the service account key. Please refer to the [help and reference](https://developer.hashicorp.com/vault/tutorials/secrets-management/gcp-secrets-engine#help-and-reference) section for more information.
{% endhint %}
#### Renew an existing lease
Depending on the secrets engine configuration, leases can be renewed for a service account key up to the `max_ttl` defined in the configuration. When you configured the GCP secrets engine you defined a default `ttl` of `2m` and a `max_ttl` of `10m`. This means you can renew the lease for up to a total of 10 minutes.
1. Read the `edu-app` roleset to generate a new key.
```shell-session
$ vault read gcp/roleset/edu-app-key/key
Key Value
--- -----
lease_id gcp/roleset/edu-app-key/key/ra4SvjyYlp9udTrkCBnsK3Ky.RfmoS
lease_duration 2m
lease_renewable true
key_algorithm KEY_ALG_RSA_2048
key_type TYPE_GOOGLE_CREDENTIALS_FILE
private_key_data ewogICJ0eXBlIjogInNlcnZpY2VfY...snip...dmF0ZV9rZXlfaWQiOiAiMWIyNzViOG
```
2. Copy the `lease_id` and lookup details about the lease.
```shell-session
$ vault lease lookup
Key Value
--- -----
expire_time 2023-03-01T20:00:55.521919304Z
id gcp/roleset/edu-app-key/key/lJEjjNlYemVHs3TGpGqB4bfT.xET7e
issue_time 2023-03-01T19:58:55.521918994Z
last_renewal
renewable true
ttl 1m48s
```
The `ttl` will be some value less than 2 minutes.
3. Renew the lease.
```shell-session
$ vault lease renew gcp/roleset/edu-app-key/key/
Key Value
--- -----
lease_id gcp/roleset/edu-app-key/key/lJEjjNlYemVHs3TGpGqB4bfT.xET7e
lease_duration 2m
lease_renewable true
```
The lease duration is reset to 2 minutes.
The lease can be renewed up to the `max_ttl` value. Once the `max_ttl` is reached, you will receive a message that the `TTL` has been capped.
```plaintext
WARNING! The following warnings were returned from Vault:
* TTL of "2m" exceeded the effective max_ttl of "1m46s"; TTL value is capped
accordingly
```
The lease will expire once the `max_ttl` has been reached and can no longer be renewed.
#### Revoke a lease
When an application has completed the process that requires a service account key, the lease can be revoked before the TTL has expired. This is espcially useful with GCP service account keys which allow a maximum of 10 keys per service account. In large environments with multiple applications, the maxiumum number keys could be reached quickly.
1. Read the `edu-app-key` roleset to generate a new key.
```shell-session
$ vault read gcp/roleset/edu-app-key/key
Key Value
--- -----
lease_id gcp/roleset/edu-app-key/key/ra4SvjyYlp9udTrkCBnsK3Ky.RfmoS
lease_duration 2m
lease_renewable true
key_algorithm KEY_ALG_RSA_2048
key_type TYPE_GOOGLE_CREDENTIALS_FILE
private_key_data ewogICJ0eXBlIjogInNlcnZpY2VfY...snip...dmF0ZV9rZXlfaWQiOiAiMWIyNzViOG
```
2. Copy the `lease_id` and lookup details about the lease.
```shell-session
$ vault lease lookup
Key Value
--- -----
expire_time 2023-03-01T20:00:55.521919304Z
id gcp/roleset/edu-app-key/key/lJEjjNlYemVHs3TGpGqB4bfT.xET7e
issue_time 2023-03-01T19:58:55.521918994Z
last_renewal
renewable true
ttl 1m48s
```
The `ttl` will be some value less than 2 minutes.
3. Use the `lease_id` to revoke the lease early.
```shell-session
$ vault lease revoke
All revocation operations queued successfully!
```
4. Attempt to look up the lease again.
```shell-session
$ vault lease lookup
```
**Example output:**
```plaintext
error looking up lease id gcp/roleset/edu-app-key/key/sghVz5UYVCDF4wuERLQqVyD3.xET7e: Error making API request.
Namespace: admin/
URL: PUT https://vault-cluster2-public-vault-3819696e.d70ca1bc.z1.hashicorp.cloud:8200/v1/sys/leases/lookup
Code: 400. Errors:
* invalid lease
```
The lease ID is now invalid.
---
# Agent Instructions
This documentation is published with GitBook. GitBook is the documentation platform designed so that both humans and AI agents can read, navigate, and reason over technical content effectively. Learn more at gitbook.com.
## Querying This Documentation
If you need additional information that is not directly available in this page, you can query the documentation dynamically by asking a question.
Perform an HTTP GET request on the current page URL with the `ask` query parameter, and the optional `goal` query parameter:
```
GET https://docs.enclaive.cloud/vault/tutorials/use-cases/dynamic-credentials-for-cloud-providers/gcp.md?ask=&goal=
```
`ask` is the immediate question: it should be specific, self-contained, and written in natural language.
`goal` is optional and describes the broader end goal you are ultimately trying to accomplish on behalf of the user. GitBook uses it to tailor the answer towards what is most useful for that goal.
The response will contain a direct answer to the question and relevant excerpts and sources from the documentation.
Use this mechanism when the answer is not explicitly present in the current page, you need clarification or additional context, or you want to retrieve related documentation sections.
{% endtab %}
{% tab title="OAuth account impersonation" %}
An application can read the Vault roleset to impersonate a service account and generate a unique OAuth token.
1. Read the `edu-app-token` roleset to generate a new token.
```shell-session
$ vault read gcp/impersonated-account/impersonate-vault-service/token
Key Value
--- -----
expires_at_seconds 1677772328
token ya29.c.b0Aaekm1JDyWPbVqy...snip...ccVteJkpyvRBbYbWqli5Oz
token_ttl 10m
```
The token is generated with the TTL of ten minutes because the max TTL defined in the secrets engine configuration was set to 10m.
OAuth tokens are managed by GCP, and not visible in the GCP console.
{% endtab %}
{% tab title="Service account key" %}
An application can read the Vault roleset to generate a unique service account key.
1. Read the `edu-app` roleset to generate a new key.
```shell-session
$ vault read gcp/roleset/edu-app-key/key
Key Value
--- -----
lease_id gcp/roleset/edu-app-key/key/ra4SvjyYlp9udTrkCBnsK3Ky.RfmoS
lease_duration 2m
lease_renewable true
key_algorithm KEY_ALG_RSA_2048
key_type TYPE_GOOGLE_CREDENTIALS_FILE
private_key_data ewogICJ0eXBlIjogInNlcnZpY2VfY...snip...dmF0ZV9rZXlfaWQiOiAiMWIyNzViOG
```
The `lease_duration` is set to `2m` because the TTL defined in the secrets engine configuration was set to 2m.
They `private_key_data` value is a base64 encoded blob that has a properly formatted JSON file which the service can use to authenticate with GCP.
2. Generate a new key and base64 decode the `private_key_data` field to reveal the JSON formatted credential file.
```shell-session
$vault read --field private_key_data gcp/roleset/edu-app-key/key | base64 --decode
```
**Example output:**
```plaintext
{
"type": "service_account",
"project_id": "abc-123DEFb547c4b85ab06e16606d",
"private_key_id": "16f43c11931007f0131a2148a4add81ccd889ffd",
"private_key": "-----BEGIN PRIVATE KEY-----\nMIIEvQIBADCBKcwggSj...snip.../zL\nMmXo1ma5v8V4rPTAvkHNWbM=\n-----END PRIVATE KEY-----\n",
"client_email": "vaultedu-app-1677764256@abc-123DEF1b547c4b85ab06e16606d.iam.gserviceaccount.com",
"client_id": "109361234567891786547",
"auth_uri": "https://accounts.google.com/o/oauth2/auth",
"token_uri": "https://oauth2.googleapis.com/token",
"auth_provider_x509_cert_url": "https://www.googleapis.com/oauth2/v1/certs",
"client_x509_cert_url": "https://www.googleapis.com/robot/v1/metadata/x509/vaultedu-app-1677764256%40abc-123DEF1b547c4b85ab06e16606d.iam.gserviceaccount.com"
}
```
3. Return to the GCP console.
4. Expand the hamburger menu and navigate to **IAM & Admin** >> **Service Accounts**.
5. A service account has been created in GCP based on the Vault role name `edu-app-key`.
6. Click the [**vaultedu-app-key123456789@..**](mailto:vaultedu-app-key123456789@..)**.** service account and click the **KEYS** tab.
7. The key ID associated with the service account key you created will be listed.
8. Wait two minutes and refresh the page. They key ID is no longer listed because the TTL was set to two minutes and the key was revoked.
{% endtab %}
{% endtabs %}
### Manage leases
Service token eases can be renewed or revoked by either the requesting application or by a Vault admin.
{% hint style="info" %}
Note
OAuth tokens are not managed by Vault after creation; therefore, this step is applicable to only the service account key. Please refer to the [help and reference](https://developer.hashicorp.com/vault/tutorials/secrets-management/gcp-secrets-engine#help-and-reference) section for more information.
{% endhint %}
#### Renew an existing lease
Depending on the secrets engine configuration, leases can be renewed for a service account key up to the `max_ttl` defined in the configuration. When you configured the GCP secrets engine you defined a default `ttl` of `2m` and a `max_ttl` of `10m`. This means you can renew the lease for up to a total of 10 minutes.
1. Read the `edu-app` roleset to generate a new key.
```shell-session
$ vault read gcp/roleset/edu-app-key/key
Key Value
--- -----
lease_id gcp/roleset/edu-app-key/key/ra4SvjyYlp9udTrkCBnsK3Ky.RfmoS
lease_duration 2m
lease_renewable true
key_algorithm KEY_ALG_RSA_2048
key_type TYPE_GOOGLE_CREDENTIALS_FILE
private_key_data ewogICJ0eXBlIjogInNlcnZpY2VfY...snip...dmF0ZV9rZXlfaWQiOiAiMWIyNzViOG
```
2. Copy the `lease_id` and lookup details about the lease.
```shell-session
$ vault lease lookup
Key Value
--- -----
expire_time 2023-03-01T20:00:55.521919304Z
id gcp/roleset/edu-app-key/key/lJEjjNlYemVHs3TGpGqB4bfT.xET7e
issue_time 2023-03-01T19:58:55.521918994Z
last_renewal
renewable true
ttl 1m48s
```
The `ttl` will be some value less than 2 minutes.
3. Renew the lease.
```shell-session
$ vault lease renew gcp/roleset/edu-app-key/key/
Key Value
--- -----
lease_id gcp/roleset/edu-app-key/key/lJEjjNlYemVHs3TGpGqB4bfT.xET7e
lease_duration 2m
lease_renewable true
```
The lease duration is reset to 2 minutes.
The lease can be renewed up to the `max_ttl` value. Once the `max_ttl` is reached, you will receive a message that the `TTL` has been capped.
```plaintext
WARNING! The following warnings were returned from Vault:
* TTL of "2m" exceeded the effective max_ttl of "1m46s"; TTL value is capped
accordingly
```
The lease will expire once the `max_ttl` has been reached and can no longer be renewed.
#### Revoke a lease
When an application has completed the process that requires a service account key, the lease can be revoked before the TTL has expired. This is espcially useful with GCP service account keys which allow a maximum of 10 keys per service account. In large environments with multiple applications, the maxiumum number keys could be reached quickly.
1. Read the `edu-app-key` roleset to generate a new key.
```shell-session
$ vault read gcp/roleset/edu-app-key/key
Key Value
--- -----
lease_id gcp/roleset/edu-app-key/key/ra4SvjyYlp9udTrkCBnsK3Ky.RfmoS
lease_duration 2m
lease_renewable true
key_algorithm KEY_ALG_RSA_2048
key_type TYPE_GOOGLE_CREDENTIALS_FILE
private_key_data ewogICJ0eXBlIjogInNlcnZpY2VfY...snip...dmF0ZV9rZXlfaWQiOiAiMWIyNzViOG
```
2. Copy the `lease_id` and lookup details about the lease.
```shell-session
$ vault lease lookup
Key Value
--- -----
expire_time 2023-03-01T20:00:55.521919304Z
id gcp/roleset/edu-app-key/key/lJEjjNlYemVHs3TGpGqB4bfT.xET7e
issue_time 2023-03-01T19:58:55.521918994Z
last_renewal
renewable true
ttl 1m48s
```
The `ttl` will be some value less than 2 minutes.
3. Use the `lease_id` to revoke the lease early.
```shell-session
$ vault lease revoke
All revocation operations queued successfully!
```
4. Attempt to look up the lease again.
```shell-session
$ vault lease lookup
```
**Example output:**
```plaintext
error looking up lease id gcp/roleset/edu-app-key/key/sghVz5UYVCDF4wuERLQqVyD3.xET7e: Error making API request.
Namespace: admin/
URL: PUT https://vault-cluster2-public-vault-3819696e.d70ca1bc.z1.hashicorp.cloud:8200/v1/sys/leases/lookup
Code: 400. Errors:
* invalid lease
```
The lease ID is now invalid.
---
# Agent Instructions
This documentation is published with GitBook. GitBook is the documentation platform designed so that both humans and AI agents can read, navigate, and reason over technical content effectively. Learn more at gitbook.com.
## Querying This Documentation
If you need additional information that is not directly available in this page, you can query the documentation dynamically by asking a question.
Perform an HTTP GET request on the current page URL with the `ask` query parameter, and the optional `goal` query parameter:
```
GET https://docs.enclaive.cloud/vault/tutorials/use-cases/dynamic-credentials-for-cloud-providers/gcp.md?ask=&goal=
```
`ask` is the immediate question: it should be specific, self-contained, and written in natural language.
`goal` is optional and describes the broader end goal you are ultimately trying to accomplish on behalf of the user. GitBook uses it to tailor the answer towards what is most useful for that goal.
The response will contain a direct answer to the question and relevant excerpts and sources from the documentation.
Use this mechanism when the answer is not explicitly present in the current page, you need clarification or additional context, or you want to retrieve related documentation sections.